First activity · 20 minutes

Design a character you can recognize in silhouette.

Choose a starting character above. Change one large shape (head, shoulders, or legs), one facial shape, and one costume detail. Inspect the front and side before adding more detail.

  1. Predict: Which single proportion will change the character's role or mood most?
  2. Make: Change that proportion, then compare the front and side views.
  3. Explain: Capture a view and name the choice that a viewer can notice without reading your notes.

In Blender: import the color GLB to sculpt, or the rigged GLB to test motion. The automatic rig is a starting point: inspect bending joints, refine weights, and rebuild topology when smoother deformation is needed. Use STL for Tinkercad and GLB to keep colors and animation.

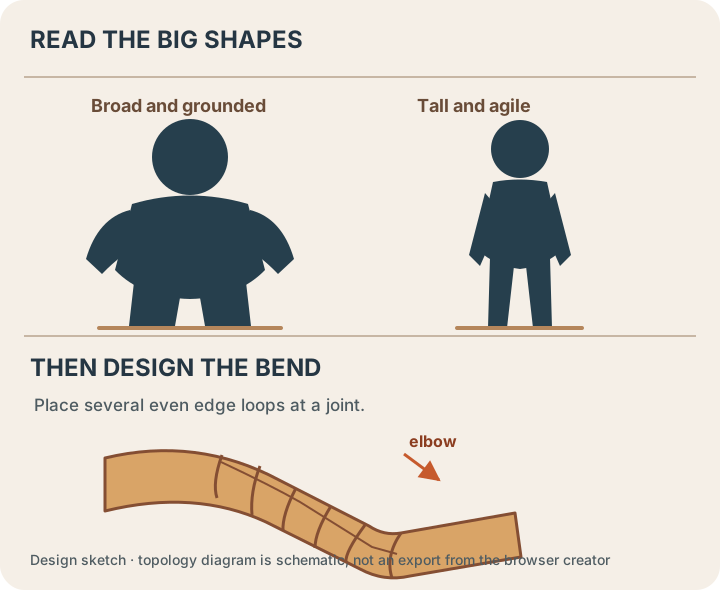
Two distinct character silhouettes beside a close-up diagram of three evenly spaced quad loops bending around an elbow.
Silhouette first; loops second.Large body masses make a design readable at a distance. Even quad loops around an elbow give the mesh room to bend. Original ClassroomOS teaching diagram.

One brief · four shape languages

Choose how your character is built.

Use the new starter buttons above, or open Style to reinterpret your current character. Compare the same character in silhouette, shaded and wireframe views.

Blocky characters

Build with cuboids: a broad torso, box head, rectangular limbs and chunky feet. Change shoulder width and head size to create a builder, robot or adventurer.

In Blender: scale separate cubes, apply scale before beveling, then add a small bevel only where you want softened corners. Keep the flat planes that define the style.

Try: make a sturdy guardian and a tiny scout with the same two colors.

3D stick figures

A round head, narrow cylindrical limbs and ball joints turn proportion into the main storytelling tool. Long arms and a small head read differently from short limbs and a large head.

In Blender: connect spheres with cylinders. Put each limb origin at its joint to pose rigid parts; a continuous bending limb needs extra geometry and weights.

Try: communicate an athlete or a curious explorer using proportions alone.

Anthropomorphic mascots

Combine an upright human-like body with animal features. Start with the fox mascot; adjust ears, muzzle and tail in Style to invent another creature.

In Blender: block the head with a sphere, add a projecting muzzle, mirror the ears and build a curved tail. Check the side view so the muzzle and tail read clearly.

Try: design a friendly school mascot using a clear silhouette and two main colors. The browser starter rig does not animate ears or tails; add dedicated bones in Blender.

Rounded humanoids

The original cast uses smooth body masses, sculpted faces, hair and costume details. Choose Explorer, Scholar or another original starter to return to this style.

In Blender: use a mirrored low-poly cage, then add subdivision where curved surfaces serve your design. Rebuild the exported study mesh with deliberate loops before demanding animation.

Try: translate your blocky character into rounded forms while preserving its identity.

Design check: capture front and side views, name three choices that make your style recognizable, and export a color GLB to continue in Blender. Separate overlapping parts are useful for a blockout; join and repair them before treating an STL as a printable solid.

Blender walkthrough, examples and deeper reference

Start with the editable technique workshop above. Reuse your model in the next lesson. The detailed walkthrough below uses Blender; choose another app using Tool Rosetta and the transfer checklist above.

Character Art · 65–80 minutes · Grades 8–12

Shape a character

Plan the silhouette first, then route a regular mesh around places that bend. This lesson box-models a simple stylized character with topology you can inspect before rigging.

Finish line: a simple, symmetric, all-quad character mesh, smoothed with a Subdivision Surface modifier.

From figure study to deforming mesh

Digital characters grew from centuries of studying structure, proportion, and movement.

Artists used anatomy drawings, clay maquettes, jointed figures, and stop-motion puppets to understand bodies in space. Computer animation added a new requirement: the surface had to be organized so a hidden skeleton could bend it repeatedly without collapsing.

Observe the figure

Proportion studies and maquettes reduced a complex body to readable masses and landmarks.

Pose a puppet

Armatures gave physical characters a controllable skeleton for frame-by-frame motion.

Route the surface

Edge loops and joints connect an editable mesh to a rig so one model can perform many poses.

Predict: Where would a clay figure crease when its elbow bends, and where should your digital edge loops go?

Blender context: Blender Foundation: from an animation-studio tool to an open 3D suite

Big ideaTopology is the route that edges take across a surface when the shape bends.
PredictA joint with evenly spaced loops should bend more smoothly than one with a crowded pole.
TestTurn on the cage, inspect the elbows and knees, then imagine a bend before smoothing.
Why it mattersGood topology preserves the artist's control later during rigging and animation.

Proportions before polygons

Set up a reference before modeling.

1

Choose a proportion

A believable stylized human is roughly 7–7.5 head-heights tall. Cartoonier styles compress toward 4–5.

2

Add a background image

Press Numpad 1, then use 3D Viewport → Shift+A → Image → Reference to trace over a front-view sketch or photo.

3

Keep it simple

Your goal is a low-poly, game-ready base — not a photoreal sculpt. Big, readable shapes beat fine detail.

CheckpointA reference image is visible in the viewport at the correct real-world height before you add your first mesh.
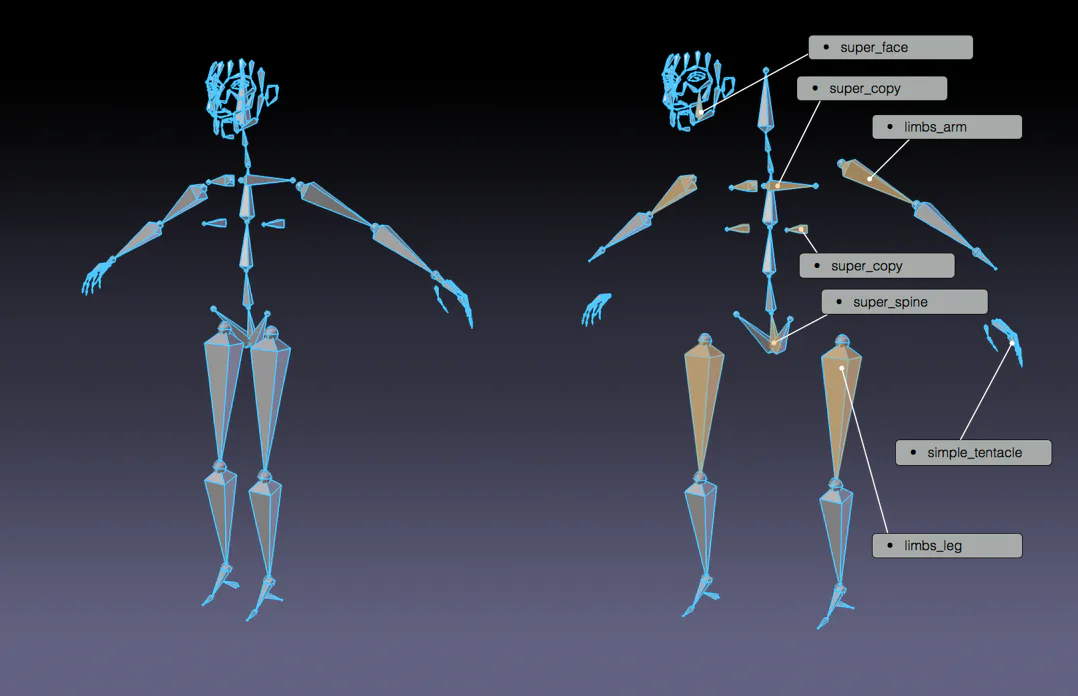
A real Blender armature: Rigify's human meta-rig, shown split into its named bone-chain components (super_face, limbs_arm, super_spine, limbs_leg, and more) against a human-proportioned figure.
A human figure, built in BlenderThis is Rigify's human meta-rig, not a proportion ruler — but it is a genuine human-shaped Blender skeleton. Stack the head height down your own reference image the same way: it catches proportion drift faster than eyeballing. Credit: Blender Manual contributors, CC BY-SA 4.0.

Extrude the skeleton of the shape

Build the torso, then extrude out from it.

  1. Start with a cube

    Scale it into the torso's rough proportions in Front view, on the +X half of the character only. Aim for a total character height around 1.7m to 1.8m so it fits the room scene later.

    Torso
  2. Extrude the arm

    In Edit Mode, select the shoulder-side face and press E repeatedly to extend an arm outward in short, jointed segments.

    Extrude
  3. Extrude the leg

    Select the base of the torso and extrude downward the same way, through hip, knee, and ankle.

    Extrude
  4. Loop cut the joints

    Press Ctrl+R near each elbow, knee, and shoulder to add the extra edge loop that lets it bend cleanly later.

    Loop cut
Mirror itSet the origin with 3D Viewport header → Object → Set Origin → Origin to 3D Cursor, then add it at Properties Editor → Modifiers (wrench) → Add Modifier → Generate → Mirror.
Nudge a whole area at once

Pulling a single vertex to shape a torso curve leaves a hard dent. Press O to turn on Proportional Editing, then G to grab — nearby geometry moves with your selection, falling off smoothly with distance. Scroll the mouse wheel while dragging to grow or shrink how far the effect reaches.

The rule that protects everything later

Keep deformation loops clear of poles.

Topology is how a mesh's edges flow across its surface. Good topology is invisible when a character stands still and essential the moment it moves.

▢

Useful at bends

Quad

A four-sided face. A run of evenly spaced quads makes edge loops easier to edit and control around a joint.

△

Place deliberately

Triangle

Triangles render normally, but a triangle on a bending elbow can interrupt the loop you need to shape the crease. Move it to a calmer area when possible.

✦

Avoid at joints

Pole

A vertex with 3 or 5+ edges connected to it. Unavoidable in a few places, but a pole sitting on a knee or elbow will pinch when it bends.

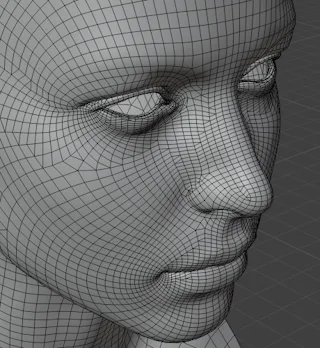
A dense Blender head mesh shown entirely in quad topology, after running Triangles to Quads.
Quad gridRegular four-sided faces make an edge loop easy to follow and adjust. Spend that regularity where the mesh must bend. Credit: Blender Manual contributors, CC BY-SA 4.0.
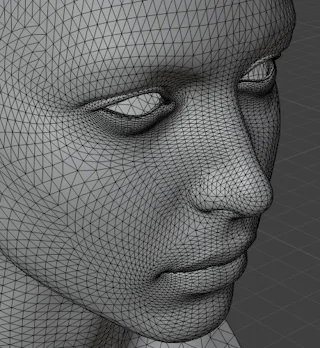
The same Blender head mesh shown entirely in triangulated topology, before running Triangles to Quads.
TriangulatedEvery face here is a triangle. Compare how difficult it is to trace one continuous loop through this layout. Credit: Blender Manual contributors, CC BY-SA 4.0.
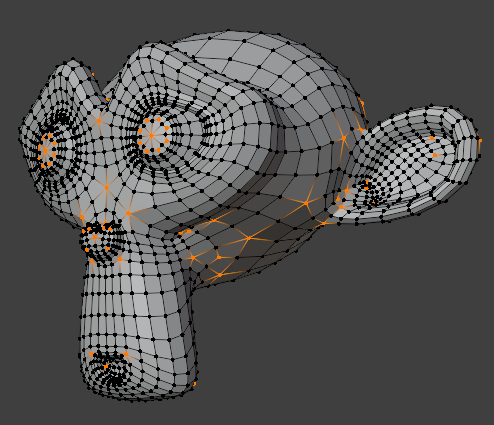
Blender's Select All by Trait → Poles by Count tool, highlighting pole vertices (irregular edge counts) on a mesh along with the faces radiating from them.
A poleHighlighted vertices here have an irregular number of edges. Harmless on a flat area — pinches badly if it lands on an elbow or knee. Credit: Blender Manual contributors, CC BY-SA 4.0.
Check your work

Enable 3D Viewport header → Viewport Overlays popover → Text Info → Statistics. In Edit Mode, use 3D Viewport header → Select → Select All by Trait → Faces by Sides to find stray triangles and n-gons.

CheckpointEven quad loops cross each elbow and knee. No pole or large n-gon sits in the area you expect to bend.
When Loop Cut can't reachA full loop cut sometimes runs through geometry you don't want split. Press K for the Knife tool instead — click to place cut points exactly where you need them, press C to cut all the way through the mesh instead of just the front face, and Enter to confirm. Use it to reroute edges around a pole rather than leaving one on a joint.
From blocky to stylized

Add a Subdivision Surface modifier.

Subdivision Surface smooths the low-poly cage into a rounded final shape while you keep editing the simple version underneath. It is non-destructive — turn it off any time to see and edit the base mesh.

  1. Add the modifier

    Properties Editor → Modifiers (wrench) → Add Modifier → Generate → Subdivision Surface Start at 2 viewport levels.

    Subsurf
  2. Crease where you need sharpness

    Select an edge loop, then use 3D Viewport → Sidebar (N) → Item → Transform → Edge Data → Crease to keep it sharp through subdivision.

    Crease
  3. Shade Smooth

    3D Viewport → Object Mode → Object → Shade Smooth by Angle keeps the surface continuous while preserving edges above the chosen angle.

    Shading

Hands on

Finish a simple standing character.

  1. Block torso, one arm, one leg

    Extrude from a single torso cube on the +X half, following your reference image.

    Block-out
  2. Add the head

    Extrude or add a separate sphere for the head, scaled to your chosen head-height proportion.

    Head
  3. Loop cut every joint

    Shoulder, elbow, wrist, hip, knee, ankle — each needs at least one extra edge loop.

    Joints
  4. Mirror across X

    Fix the origin to the centerline, then use Properties Editor → Modifiers → Add Modifier → Generate → Mirror.

    Mirror
  5. Add Subdivision Surface

    Smooth the form, crease any edges that should stay sharp, then Shade Smooth.

    Smooth
  6. Clean and save

    Check for stray triangles or poles at joints, rename the object, and save as 05-character.blend.

    Finish
The mesh looks lumpy, pinched, or broken after Subdivision Surface?
  • Look for a pole (3 or 5+ edges) sitting exactly on a joint — reroute the edge flow around it instead.
  • Check for an n-gon (5+ sided face) hiding on a flat panel — Subdivision Surface handles these poorly.
  • Make sure your loop cuts near joints are evenly spaced, not bunched to one side.
  • Check for internal faces or non-manifold geometry: Select → Select All by Trait → Non Manifold and delete them.
  • Recalculate normals if shading is weird: Select all in Edit Mode and press Shift+N.

Exit ticket

Is this mesh ready to rig?

1. Why move a triangle away from a bending elbow when possible?
2. What is a "pole" in mesh topology?
3. What does Edge Crease do under a Subdivision Surface modifier?

Definition of done

Continue to Props & Tools →
Want to rig and animate this character?

The Character Rigging and Character Animation lessons in the Game Asset Studio pathway pick up exactly where this one ends.