Opposite limbs reach
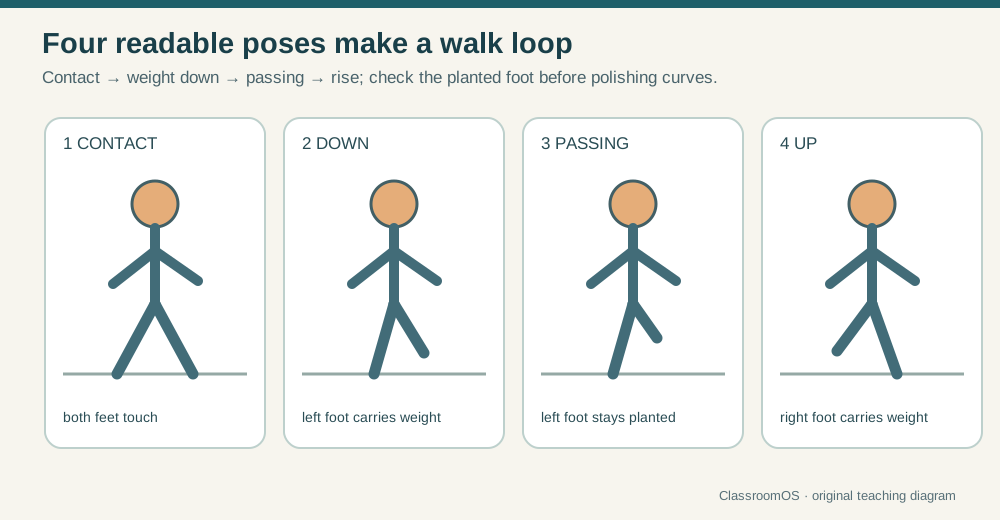
Front heel and back toe meet the ground; arms oppose the legs.
Pause at each extreme and ask which foot carries the character’s weight.
Why key poses still matter
Animators chose important poses long before computers made 3D characters. Software changed how the frames between poses are made, but the artist still decides the action, timing, and weight.
Try it in the editable workshop: Add three key poses. Put the middle pose closer in time to the first, then replay. Which part moves faster? Keep the timing that matches your character's purpose.
For the wider history of modeling, rendering, and accessible tools, visit the 3D Design timeline.
Start with the editable technique workshop above. Reuse your model in the next lesson. The production workflow below extends the browser exercise and helps you test work made in your chosen app.
Lesson 06 · 75 minutes · Motion design
Create two game-ready actions: an idle that communicates character and a walk that loops cleanly. Explore how the same rig moves in naturalistic, cartoon, anime-inspired, and low-poly styles—then choose a motion language that fits your game.
Animation brief
| Idle purpose | Show breathing, alertness, weight, and personality without distracting the player. |
|---|---|
| Walk purpose | Communicate speed, mass, attitude, and reliable locomotion. |
| Frame rate | Set a stable scene rate, then decide whether motion plays smoothly, on twos, or with intentional stepped holds. |
| Style brief | Name the visual language—naturalistic, cartoon, anime-inspired, retro, or a deliberate hybrid—and define how far poses should be pushed. |
| Root motion | For this lesson, animate in place so the engine's character controller handles world movement. |
| Loop contract | The final displayed pose must flow into the first without a visible hitch. |
Controlled stillness
Idle.Store it as its own named clip or action, and protect it so your app doesn't delete it as unused.Four-pose structure
Front heel and back toe meet the ground; arms oppose the legs.
Body reaches its lowest point; front foot settles and limbs bend.
Support leg straightens while the free foot travels under the hips.
Heel lifts and the body reaches its highest point before the next contact.
Pose one half-cycle, copy it to the second half, then mirror the pose. Do not judge the walk from one angle—check front, side, and perspective views.
One rig, different motion languages
A convincing walk does not have one universal shape. Match exaggeration, spacing, and playback cadence to the game’s art direction.
Subtle rise and fall, moderate reach, smooth spacing, and restrained overlap support cinematic or realistic characters.
24–30 fps · smooth curvesPush the high and low poses, open the silhouette, and let anticipation and follow-through carry personality.
24 fps · broad arcsHold readable drawings, then snap through transitions. Spend frames on the pose that communicates the idea.
12–24 fps · held accentsUse fewer sampled poses, crisp changes, and a compact silhouette that remains readable at gameplay distance.
8–12 fps · stepped timingAdaptive walk-cycle simulator
Start with a still mannequin. Build Contact, Down, Passing, and Up yourself; the second step mirrors your four poses. Your finished work is an eight-pose picture strip and a study file you can reopen.
Style changes timing and presentation; it does not fill in your poses.
0 / 4 poses keyed · Start with Contact.
Prioritize observed weight, modest vertical motion, and continuous spacing.
Drag to orbit · scroll or pinch to zoom. Use Side to inspect foot clearance and Front to compare limb opposition.
Keyboard: ← → scrub · Space play/pause · 1–4 select a pose
HipsLeft footRight footFloor
This is a tiny curve editor, like the Graph or Curve Editor in your animation app. In the top lane, Down should be the lowest dip of the hip curve and Up the highest peak. In the bottom lane, a foot curve inside the red band has sunk into the floor; a flat stretch along the floor line is a planted foot; the bump is the foot clearing the ground as it swings. Switch art styles and watch smooth curves turn into held or stepped ones.
Save your keyed poses, experiment notes, style, and speed as a reusable study file.
Measure before and after changing one slider.
My handmade walk uses your pose values, with no supplied animation clip. Reference character shows the supplied CC0 walk with adjustments. Floor markers indicate proximity, not locked contacts. Measurements use mannequin units, not human biomechanics. PNG strips contain your eight key poses; study files retain editable settings. Rebuild the result in your animation app for an animated game asset.
Curves serve the poses
Clips into any engine
Idle and Walk; remove or rename test actions that should not ship.character_animated_v01.glb Include named Idle and Walk clips plus a short engine capture showing both loops. Any animation app → Bench → any engine
Drop the exported character. Every clip plays here exactly as an engine will play it. The Bench flags default clip names (Armature|Action, mixamo.com), loops whose first and last poses don't match, and walks with root motion. Rename clips, fix loop pops, and download one .glb with every clip inside.
Where is export (and re-import) in your app? Pick your apps below; your choice is remembered across lessons.
Free, fast, and professional apps
The fastest route from a humanoid character to a working idle, walk, run, or action clip. Adjust speed and arm spacing, download the motion, then study or refine it elsewhere.
Open Mixamo ↗Keyframes, Dope Sheet, Graph Editor, nonlinear animation, constraints, pose libraries, motion paths, and glTF export cover the full game-animation pipeline without a subscription.
Explore Blender animation ↗A character-animation specialist with AutoPosing, physics-based tools, inbetweening, unbaking, and retargeting. A free non-commercial tier exists, while paid plans unlock standard pipeline exports and commercial use.
Compare Cascadeur plans ↗A deep professional animation environment for keyframe, nonlinear, motion-capture, retargeting, motion trails, custom rigs, scripting, and large production pipelines.
Explore Maya ↗Mixamo is free with an Adobe ID and currently targets bipedal humanoids. Cascadeur’s free plan has commercial and export restrictions, so check the official plan comparison before choosing it for a shipped game.
Definition of done
0/5 checked
You have shipped a small environment and an animated character pipeline.
References: Blender Manual: Animation and Godot import configuration.