Neutral stance
Use a relaxed A-pose or T-pose with limbs separated enough to select and weight.
Success: explain how joint placement, topology and weights change a bend; export a rig that still moves after import. Work with a partner: one changes a setting while the other records evidence.
Exit question: Why can an OBJ look correct but fail to bend in another app? Which data must travel with the mesh?
The workshop above creates the exported two-bone asset. The optional character weight-paint exercise below is separate practice; its brush edits are not included in the workshop GLB.
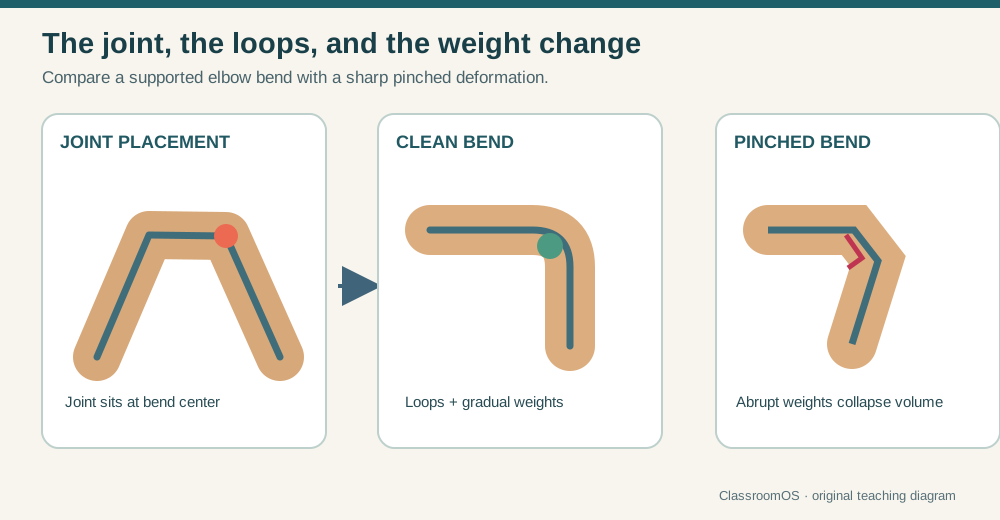
The joint position, support loops, and weight transition all affect the bend.
Start with the editable technique workshop above. Reuse your model in the next lesson. The production workflow below extends the browser exercise and helps you test work made in your chosen app.
Lesson 05 · 75 minutes · Character setup
A rig connects a controllable skeleton to a mesh. Good rigging means placing useful joints, assigning predictable influence, and proving the character can hold the poses the game needs.
Prepare the mesh
Use a relaxed A-pose or T-pose with limbs separated enough to select and weight.
Elbows, knees, shoulders, and hips need enough well-placed loops to bend without collapsing.
Correct the centerline and left/right shape before weights make changes harder.
Character and armature should share clean transforms and the same world orientation.
character_pre_rig. Rigging changes many relationships at once; a clean restore point saves time.Anatomy as hinges
.L/.R, _l/_r, or Left/Right) so your app can mirror and engines can retarget.Every rigging app separates two jobs: editing the rest pose (where joints sit) and posing (testing and animating). Do not “fix” rest placement by posing bones.
Connect mesh to skeleton
Weight-paint simulator
This is the same rigged Quaternius dummy the animation lesson uses, so the joints you weight here are the joints you'll pose there. Choose the upper-arm or forearm bone, set brush strength, then click the mesh near the elbow to assign influence. Blue follows the upper arm; red follows the forearm. Bend the elbow to expose stray weights, then return near rest before you keep painting—the same return-to-neutral habit real riggers use to keep brush strokes predictable.
Repair influence
| Symptom | Inspect | Repair |
|---|---|---|
| Torso moves with hand | Unexpected hand weights on torso vertices | Subtract influence and normalize |
| Elbow pinches sharply | Too few loops or abrupt weight boundary | Add/support topology or smooth transition |
| Both sides move | Centerline or mirrored group spill | Clean left/right groups and mirror carefully |
| Foot collapses | Ankle joint placement and foot weights | Reposition in rest pose, then repaint |
Pose sheet
Test: arms forward and overhead, elbows near 90°, deep knee bend, one-leg stance, torso twist, head turn, and a curled crouch. The goal is predictable volume for the character’s actual motion range, not perfect anatomy.
character_rigged_v01.glbSubmit front, side, and three stress-pose screenshots. Keep the pre-rig backup.Add non-deforming control bones for hands or feet. Confirm they help posing but do not create unwanted vertex groups or game-engine deformation bones.
Any rigging app → Bench → any engine
Rigs break in transit more than anything else. Export from Blender, Maya, 3ds Max, Mixamo, AccuRIG or Cascadeur, then drop the file here. The Bench counts bones, finds skin weights that don't add up to 1, converts centimetre rigs to metres without breaking the skeleton, and plays any clips so you can watch the deformation.
Where is export (and re-import) in your app? Pick your apps below; your choice is remembered across lessons.
Free, fast, and professional apps
Armatures, automatic skinning, weight painting, constraints, drivers, Rigify, custom controls, and game-friendly export make Blender a complete no-cost rigging workstation.
Explore Blender rigging ↗A free automatic humanoid rigger designed around five guided steps. It supports A/T poses, multiple meshes, joint refinement, and export to major 3D platforms.
Try AccuRIG ↗Upload a clean biped, place a few joint markers, and receive an automatically rigged character ready for its motion library. It is free with an Adobe ID, but supports humanoid bipeds only.
Open Mixamo ↗A professional character pipeline with skeletons, skinning, constraints, procedural rig modules, scripting, and deformation tools. Choose it for complex custom rigs and large studio collaboration.
Explore Maya ↗Auto-rigging saves setup time, not judgment. Always test shoulders, elbows, hips, knees, fingers, accessories, and root behavior before approving the result.
Definition of done
0/4 checked
Your character is ready to receive reusable motion.
Reference: Blender Manual: Armatures. The Rosetta tables give the same steps in other apps.