Describe the surface
Color, contrast, and highlights persuaded the eye that a flat image contained different materials.
Make something worth presenting · no install needed
Art-direct a product image for a handmade ceramic, a futuristic metal tool, or a soft rubber toy. Start with the sample forms, or use Open project to bring in a saved 3D workshop model of your own.
Pin comparison keeps a reference beside the live preview. Select the reference to enlarge it. The preview uses reflection cards for lighting studies. Save the workshop project to keep the editable material and lighting settings.
Every slider has a number box. Camera buttons and arrow keys offer alternatives to dragging. Undo lets you explore and return to an earlier decision.
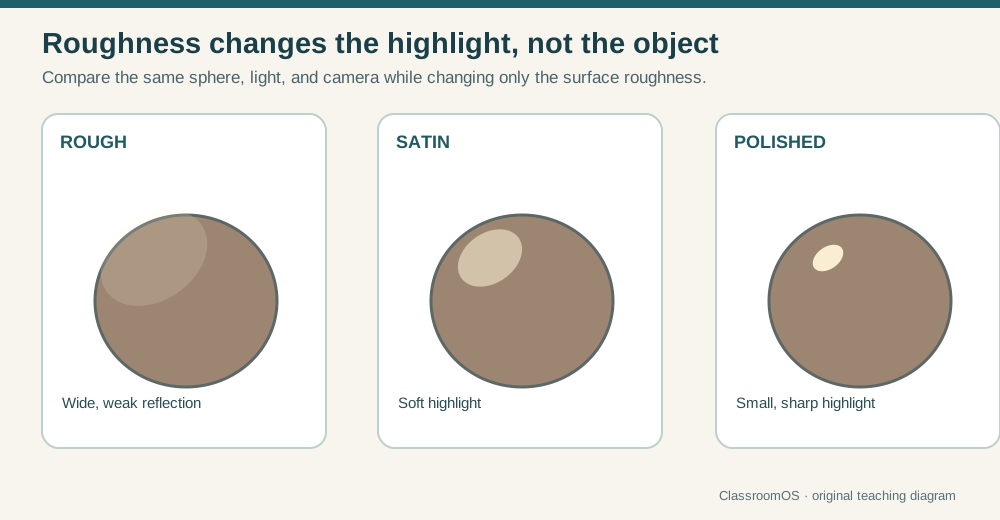
Hold the model and light still while changing only roughness.
Start with the editable technique workshop above. Reuse your model in the next lesson. The detailed walkthrough below uses Blender; choose another app using Tool Rosetta and the transfer checklist above.
Shading & Lighting · 75–95 minutes · Grades 7–12
Every object you've built so far is still the default gray. This lesson unwraps a surface, builds a real material, lights it on purpose, and renders a finished image — the pathway's capstone skill.
Finish line: one of your pathway objects, unwrapped, materialed, lit, and rendered to a saved image file.
From painted surface to simulated light
Painters learned to suggest metal, cloth, and depth through value and color. Photographers controlled lamps, exposure, lenses, and composition. Computer graphics turned those observations into material properties, texture coordinates, lights, cameras, and rendering algorithms.
Color, contrast, and highlights persuaded the eye that a flat image contained different materials.
Camera and studio-light choices controlled form, focus, mood, and what the viewer noticed first.
Shaders calculate how a modeled surface responds to light; renderers turn the scene into pixels.
Predict: Which change will reveal form more clearly—a brighter object color or moving the key light sideways?
Blender context: Blender Foundation: Blender began with animation and ray-tracing tools
UVs
Unfold the surface
Every mesh face needs a matching 2D location in a flat "UV" layout before an image texture can wrap around it correctly. Think of it like unfolding a cardboard box flat before printing a design on it.
In Edit Mode, select edges where the unfold should split — like the inside seam of a sleeve — and press Ctrl+E → Mark Seam.
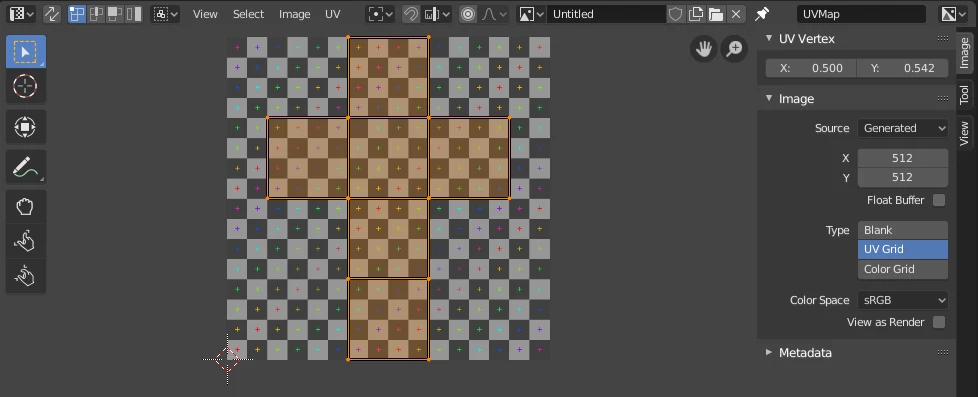
Select all (A) and press U → Unwrap. Open a UV Editing workspace tab to see the flattened result.
UV Editor header → Image → New → Generated Type → UV Grid, then confirm. Even squares mean a healthy unwrap; stretched squares mean the seams need adjusting.
Material
One node covers most materials
Create one at Properties Editor → Material Properties (red sphere) → New, then open the Shading workspace. The new material starts with a Principled BSDF node.
The color
The surface's raw color, or an Image Texture node plugged into this input.
Shiny vs. matte
0 is a mirror, 1 is chalk-matte. Most real-world materials sit between 0.3 and 0.7.
Metal or not
0 for wood, fabric, or plastic. 1 for bare metal. Rarely anything in between.
Shading workspace → Shader Editor → Shift+A → Texture → Image Texture Load an image, then connect Color to the Principled BSDF's Base Color.
Paint
Straight onto the pixels
An Image Texture node holds pixel data like any picture file. Texture Paint mode lets you paint straight onto it in the 3D Viewport with a brush, instead of round-tripping through an external image editor — good for grime, scratches, and hand-placed detail a plain image alone won't give you.
In the Shading workspace's Shader Editor, click your Image Texture node once so it's outlined white. Texture Paint always paints onto whichever Image Texture node is currently active.
Open the Texture Paint workspace tab, or use the mode dropdown. You need real UVs first (section 01) — Blender uses them to know where a brush stroke lands on the flat image.
Draw lays down flat color; Soften and Smear blend pixels that are already there instead of adding new ones. Adjust Radius and Strength with F and Shift+F — the same pattern as sculpt brushes.
Blend
One weight, painted by hand
A single Image Texture is one material across the whole surface, but real ground never is — sand near a path, grass in the middle, bare stone at the edges. Instead of painting that transition in an image editor, paint it directly on the mesh as a Vertex Group weight, then read that weight back in the Shader Editor to mix between two Image Texture nodes.
Object Data Properties (green triangle icon) → Vertex Groups → +, then name it something you'll remember — Blend works. Enter Weight Paint mode from the workspace tab or the mode dropdown.
Paint with the Draw brush: full Weight (red) marks one texture, zero weight (blue) marks the other, with the green-to-yellow middle blending between them. Set the brush's Weight value in the tool settings before each stroke.
Back in the Shading workspace: Shader Editor → Shift+A → Input → Attribute, set its Type to Geometry, and type your vertex group's exact name into the Name field — it won't appear in a dropdown, so a typo here silently reads nothing.
Shift+A → Color → Mix Color. Plug your two Image Texture nodes into A and B, and the Attribute node's Fac output into the Mix node's Factor. The Mix output goes to the Principled BSDF's Base Color.
A raw painted weight blends softly. For a harder edge, route the Attribute's Fac through Shift+A → Converter → Color Ramp first, then feed the ramp's output into the Mix node's Factor instead. Drag the ramp's triangular stop markers together to sharpen the blend, or apart to soften it — no repainting required.
Light
Direction sells the shape
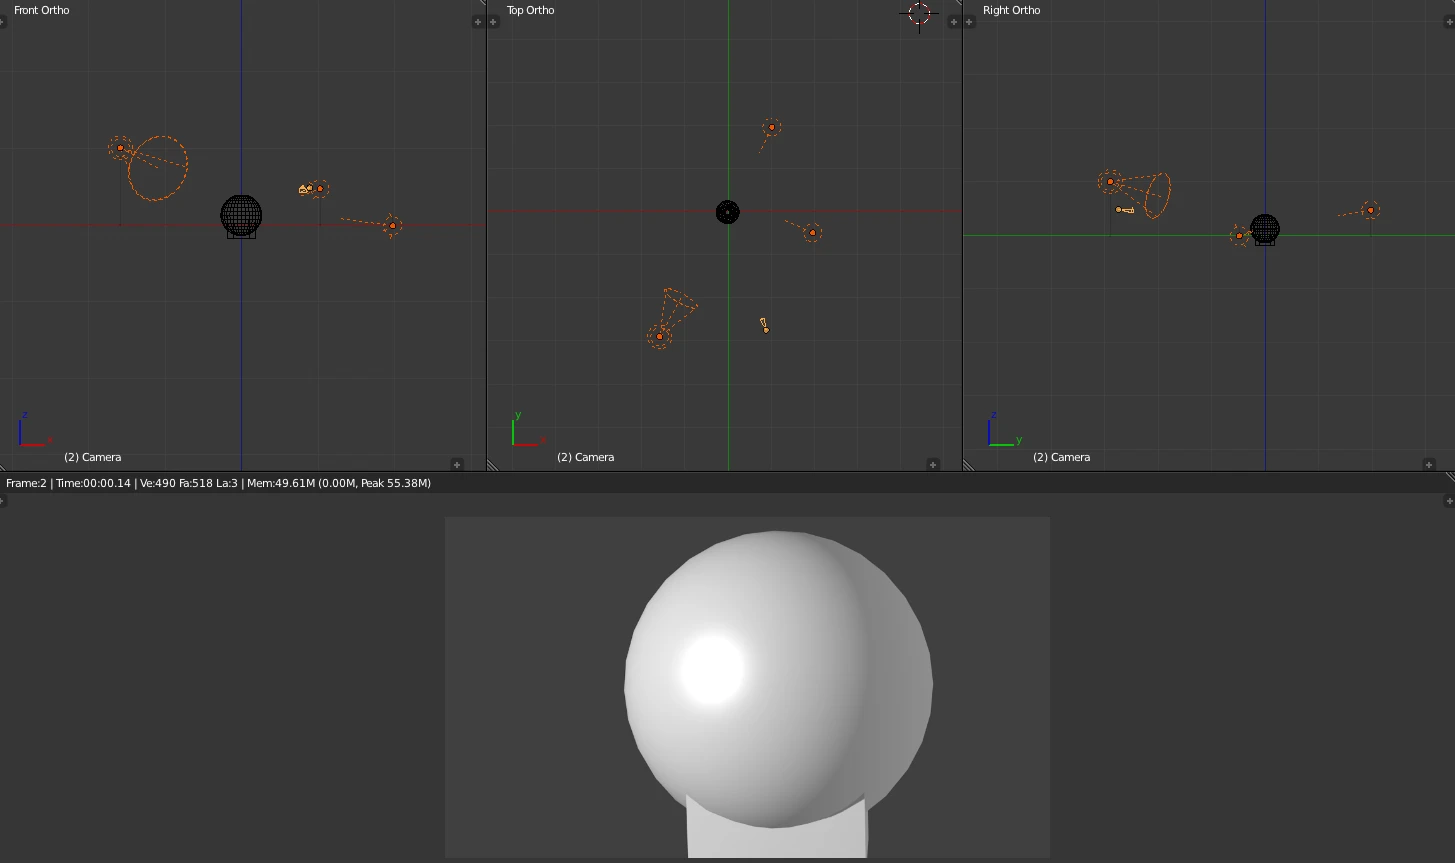
One light straight-on flattens a form. A simple three-point setup reads as intentional: a strong key light, a softer fill from the opposite side, and an optional rim light to separate the subject from its background.
Your main light, angled 30–45° from the camera. This defines the primary shadows.
A dimmer light from the opposite side, softening the shadows the key light creates.
A light from behind the subject, catching its edge to separate it from the background.
Render
Turn the scene into an image
Properties Editor → Render Properties (camera) → Render Engine → EEVEE or Cycles
Fast, real-time
Rasterized rendering — near-instant feedback, great for classroom iteration and game-style lighting.
Slower, physically accurate
Path-traced light simulation — more realistic reflections and shadows, at a real time cost per image.
Numpad 0 views the active camera. To snap it to your current view once, use Ctrl+Alt+Numpad 0. To keep adjusting the shot by orbiting the viewport itself, open the Sidebar (N) → View tab → Lock Camera to View checkbox instead — every viewport move drags the camera with it until you turn it back off.
Press F12, or use top menu → Render → Render Image. Blender opens the Render Result in the Image Editor.
In the Image Viewer, Image → Save As, and choose PNG for a lossless result.
Build
Hands on
Open a previous file (like your Lesson 03 chair or Lesson 06 tool), then File → Save As right away as 07-render.blend so we don't overwrite the original.
Switch to Edit Mode (Tab). Select edges where seams should go, press Ctrl+E → Mark Seam. Press A to select all, then U → Unwrap. Check the result in the UV Editor.
In the Shading workspace, create a new Principled BSDF material. Add an Image Texture, and use Texture Paint mode to add details. Remember to save the image internally or externally!
Call me over to look at your UV unwrap and your painted texture before you move on to lighting.
Switch to Object Mode. Add a Key light (Shift+A → Light → Area) at roughly 30° angle, and a Fill light opposite to it. Raise the World background strength slightly.
Position your view, press Ctrl+Alt+Numpad 0 to snap the camera to view. Press F12 to render, and in the Image Editor use Image → Save As to save a .png file next to your .blend.
Check