Lesson 07 · 55 minutes · View layer
The world is bigger than the screen.
The level is 1024 pixels wide; the screen shows 320. A camera decides which slice to show. You will build a camera dead zone, add smoothing and look-ahead, keep it inside the level, and add parallax scrolling for depth.
Where this comes from
Scrolling turned screens into worlds.
Early arcade games fit on one screen. Scrolling games like Moon Patrol (1982) moved layered backgrounds at different speeds to fake depth, and Super Mario Bros. (1985) scrolled a long level smoothly past a fixed-size screen. The Flappy tutorial’s moving pipes are the same trick in reverse: the world slides, the bird stays.
Camera lab
Tune how the camera follows.
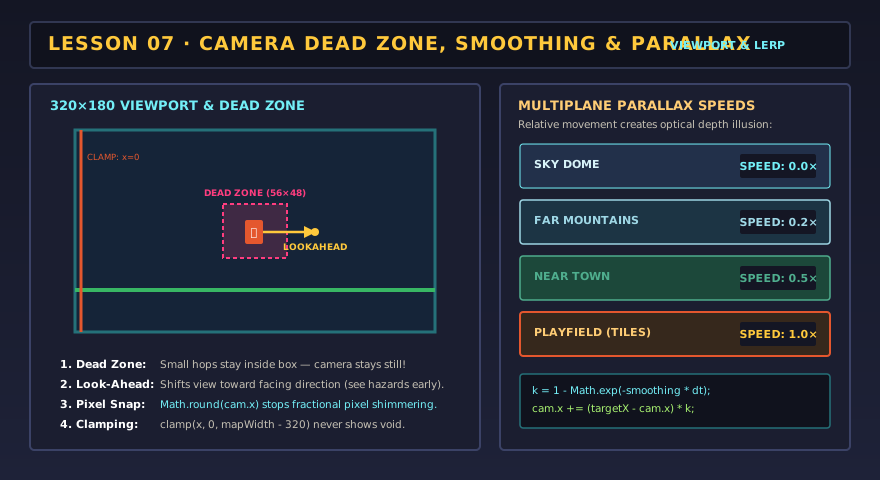
- Locked vs dead zone.Locked follows every pixel and jitters on small hops. With a dead zone, small moves don’t move the camera.
- Smoothing.0 snaps instantly; higher values glide. Too much and the player runs off-screen.
- Look-ahead.Shift the view toward where the courier is facing so players see what is coming.
- Clamp + snap.Turn clamping off at the start of the level. Turn snapping off and watch the tiles shimmer while the camera glides.
Pixel Courier cameraPink box = dead zone
Theory: screen = world − camera
Draw everything shifted by the camera.
// 1. move the target only when the player leaves the dead zone
if (px > cam.x + dzLeft + dzW) target = px - dzLeft - dzW;
if (px < cam.x + dzLeft)       target = px - dzLeft;
// 2. glide toward it (frame-rate independent smoothing)
cam.x += (target - cam.x) * (1 - Math.exp(-smoothing * dt));
// 3. keep inside the level, 4. snap to whole pixels before drawing
cam.x = clamp(cam.x, 0, levelWidth - 320);
ctx.setTransform(1, 0, 0, 1, -Math.round(cam.x), -Math.round(cam.y));
// parallax: far layers move slower than the camera
drawLayer(farHills, -cam.x * 0.2);
drawLayer(nearTown, -cam.x * 0.5);
Each background layer moves at a fraction of the camera speed. A factor of 0 is glued to the screen (sky); 1 moves with the world (tiles); between gives depth. Smoothing uses lerp: move a fraction of the remaining distance each step.
Definition of done
Your camera is ready when…
0/4 checked
Evidence: Describe your final camera settings and the reason for each in two sentences.
Lesson 07 complete?
Your art and settings are already saved for the next lesson.