School musical production • Grades 6–12 • 40–55 minutes

Stage plotting

Before moving the scenery, make a plan everyone can read. A ground plan shows the stage from above: where things stand, how much space they need, and where people can move. Design one scene of your musical, test the layout, then print it for your crew.

The designer is right below. New to ground plans? Read Read the stage from above and the Pirates worked example first.

Stage layout designer

Top view • Audience at the bottom

Changing units converts the stage and all items. Changing stage size keeps item measurements; check for items outside the new stage.

Your plan saves on this browser and device. Download a backup to keep it or move computers.

Drag an item to move it. Select an item below to edit its measurements. Keyboard: Tab to an item, then use arrow keys to move it by one grid step; hold Shift for smaller steps. Numbered items match the item list.

Print includes the diagram, measurements, item list, and notes. Choose landscape paper; turn off browser headers and footers for a cleaner handout.

Read the stage from above

Use the performer’s directions

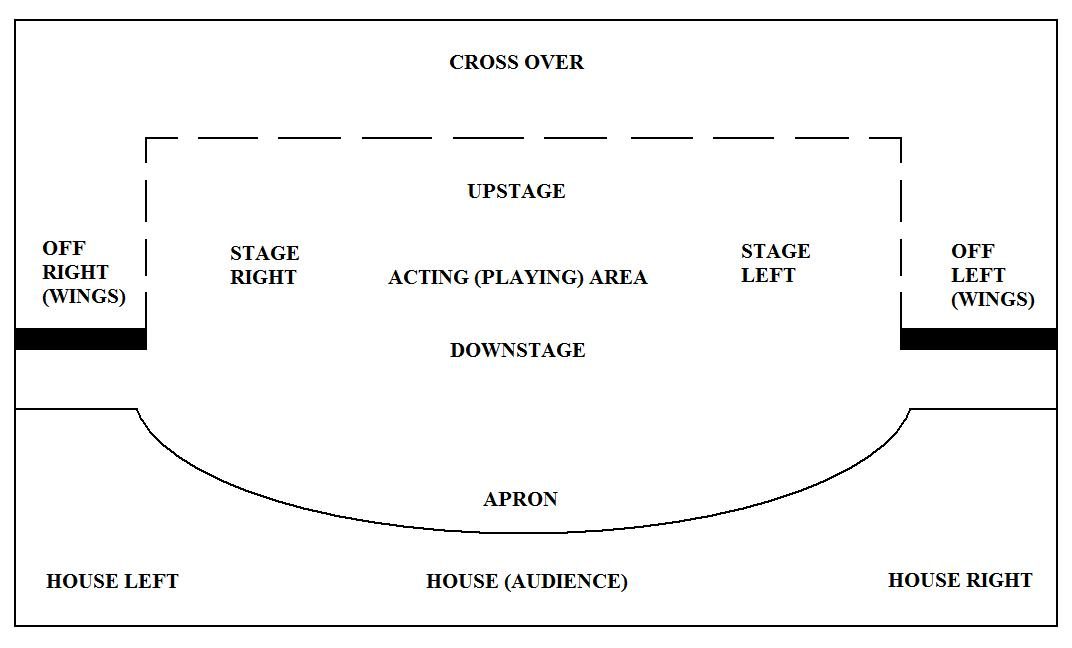
Stage left and stage right belong to a performer facing the audience. With the audience at the bottom of this plan, stage left is on the page’s right. Downstage is toward the audience; upstage is away from them.

The dashed centerline splits the stage into left and right. The front edge here is the downstage edge of our simplified playing area.

Measure footprints

Measure your usable playing area and each object’s footprint: the floor space it occupies. A 6-foot bench needs twice the width of a 3-foot table in the same plan.

The grid and scale bar use the units you select. The printed plan fits the page; read the dimensions rather than measuring the paper with a ruler. This tool models a rectangular, end-on stage.

Leave room for the show

Plot scenery and performers, then reserve clear areas for entrances, exits, crossings, and shifts. Test the routes in rehearsal with the real costumes and props.

Record the approved wing storage and quick-change locations in your notes. This plan shows the playing area; wing space, rigging, object heights, and audience sightlines need a separate venue check with your teacher.

See it on real stages

Plans, sets and rigging from real theatres. Click a photo to enlarge it and discuss it with your class.

A plan view of a proscenium stage labelled upstage, downstage, stage right, stage left, the wings on each side, the crossover behind and the apron in front, with the house at the bottom
The areas, from aboveA plan names every zone: the playing area, the wings on each side, the crossover behind the set (a hidden path from one side to the other) and the apron in front. Stage right is on the plan’s left; house left is the audience’s left. DJSparky · CC BY-SA 3.0 · Wikimedia Commons ↗
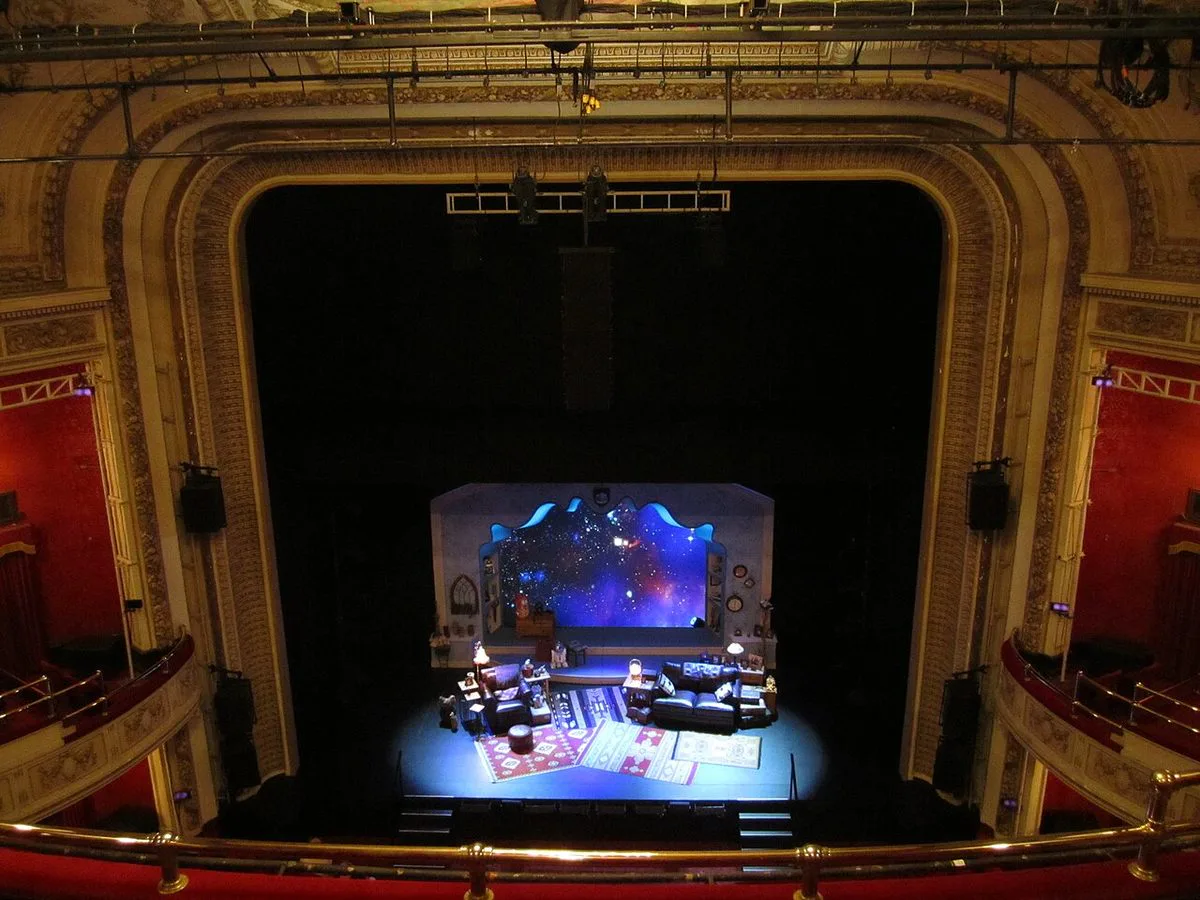
The stage of the Royal Alexandra Theatre in Toronto seen from a high balcony, with a small set of furniture lit in blue
A real set, seen from aboveFrom the balcony of Toronto’s Royal Alexandra Theatre you can read the stage the way a ground plan does: each piece’s footprint, the open floor, and the masking at the sides. Mack Male · CC BY-SA 2.0 · Wikimedia Commons ↗
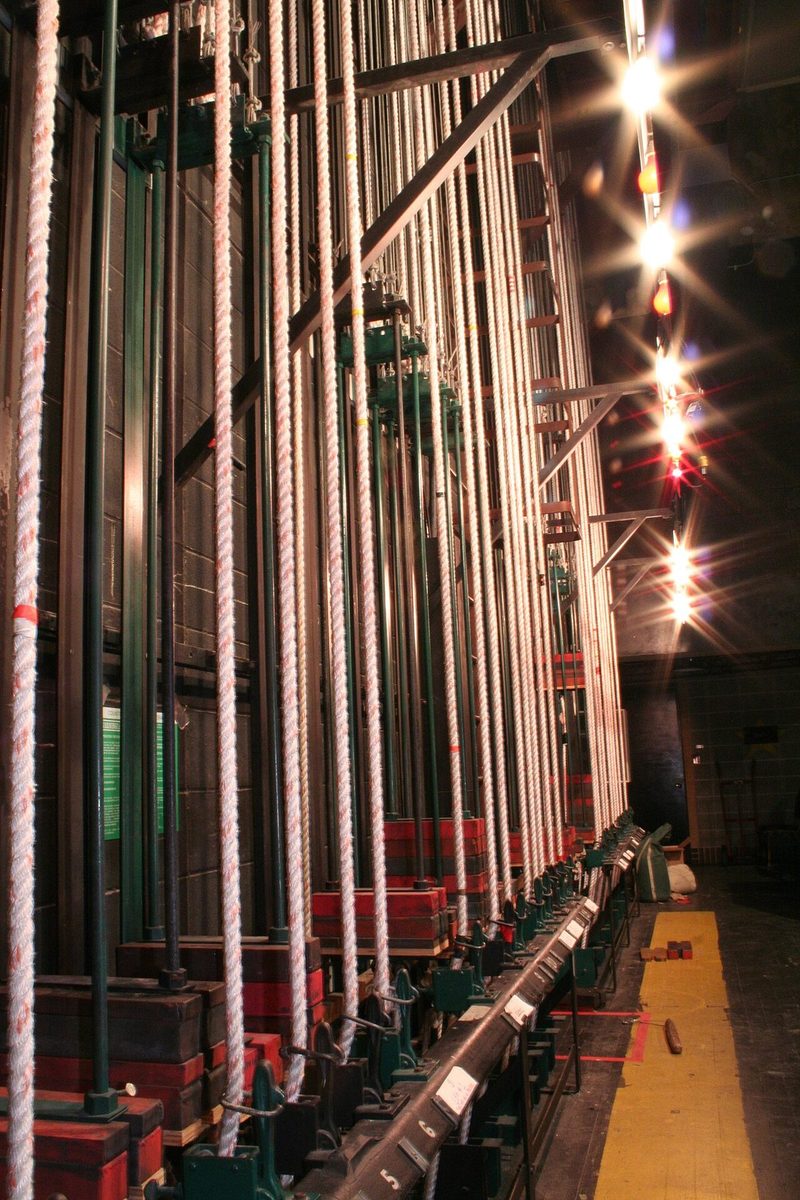
A theatre fly system’s lock rail: a long row of ropes with brake handles and small index lights at the side of a stage
Off the plan: the fly railCrew raise and lower scenery here with ropes and counterweights. A ground plan only shows the floor, so ask where flown pieces land and which wing space must stay clear. JWGreen · CC BY-SA 3.0 · Wikimedia Commons ↗
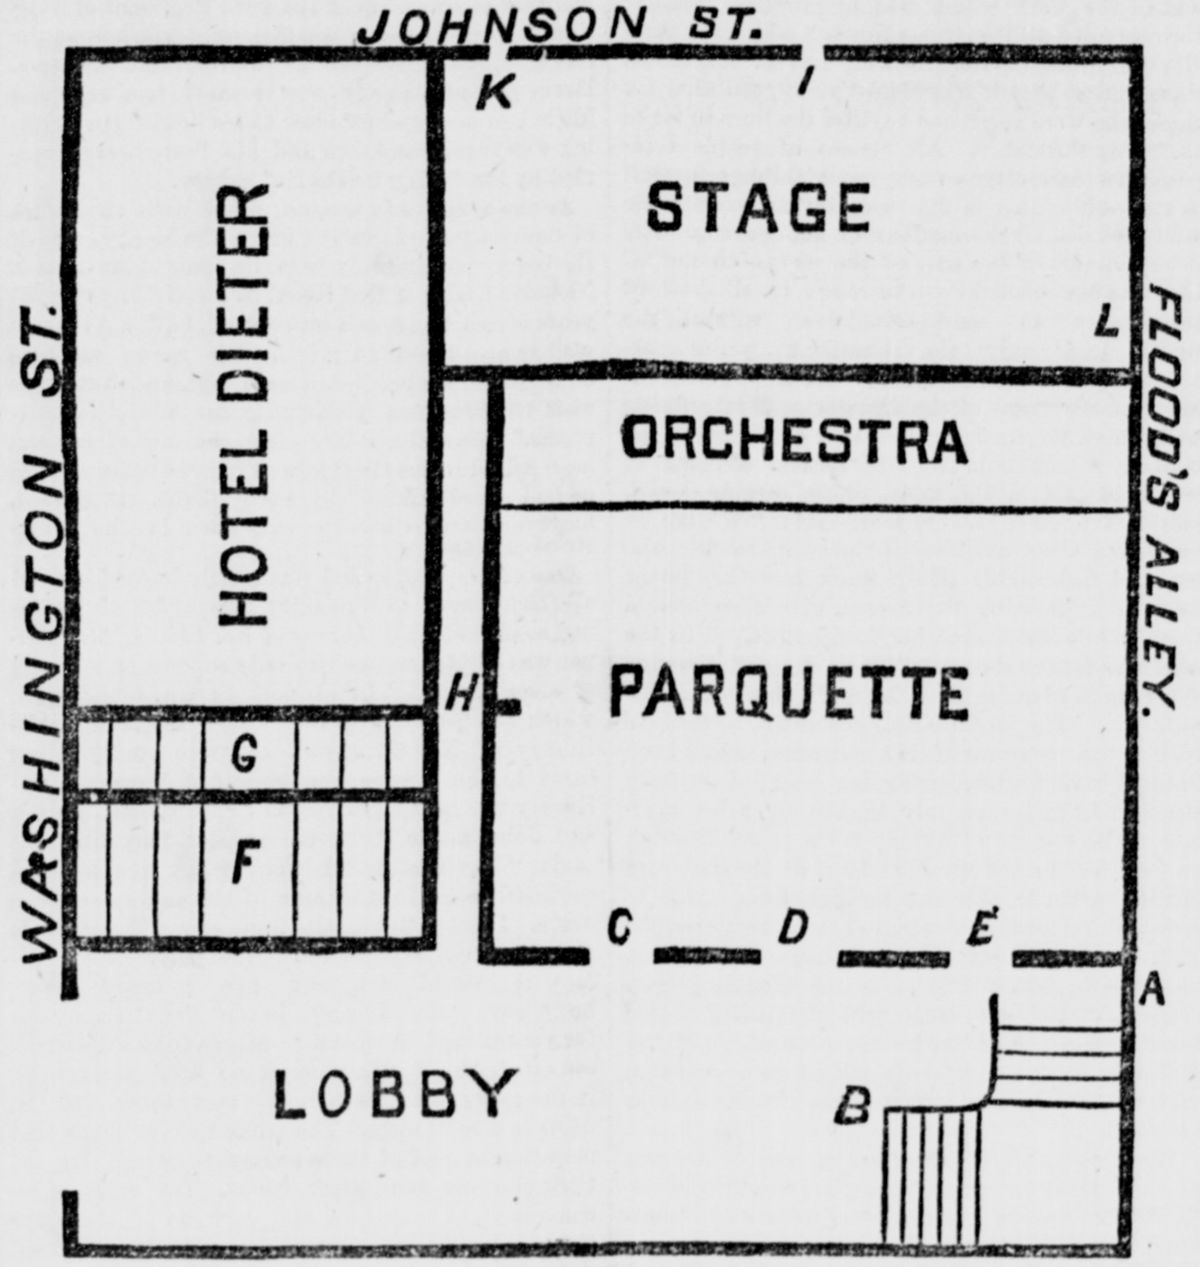
A newspaper floor plan of the Brooklyn Theatre in 1876 showing the stage, orchestra, parquet, lobby and lettered exits
Why plans show the ways out (1876)After the Brooklyn Theatre fire, one of the deadliest theatre fires in U.S. history, a newspaper printed this plan to show how people tried to escape. The clear areas in your plot carry on that rule: routes stay open. New York Tribune, Dec. 7, 1876 · Public domain · Wikimedia Commons ↗

Worked example: from a libretto to a ground plan

Scripts describe the set in words. Here is how W. S. Gilbert opens The Pirates of Penzance (1879), a comic opera schools still perform, and how a designer turns that paragraph into a plan.

“A rocky seashore on the coast of Cornwall. In the distance is a calm sea, on which a schooner is lying at anchor. Rock L. sloping down to L.C. of stage. Under these rocks is a cavern, the entrance to which is seen at first entrance L. A natural arch of rock occupies the R.C. of the stage. As the curtain rises groups of pirates are discovered … FREDERIC is seated in a despondent attitude at the back of the scene. RUTH kneels at his feet.”

W. S. Gilbert, The Pirates of Penzance, Act I (public domain; Project Gutenberg). The ellipsis marks words left out.
Ground plan: The Pirates of Penzance, Act I A 30 by 20 foot stage seen from above with the audience at the bottom. 1, a rock platform on stage left (the right side of the plan) slopes down toward left-center. 2, the cavern mouth opens under the rock at the first entrance on stage left. 3, a natural rock arch stands right of center. 4, a keep-clear route runs from upstage through the arch to downstage, for the Pirate King's entrance. 5 and 6, two groups of pirates downstage. 7, Frederic sits at the back with Ruth kneeling at his feet. 8, a painted drop of the sea and a schooner hangs upstage. 12345678 drop: calm sea and schooner centerline DOWNSTAGE EDGE · AUDIENCE UPSTAGE STAGE RIGHT STAGE LEFT 10 ft
One possible plan for a 30 × 20 ft stage. Numbers match the item list below. The measurements are invented for this example.

Decode the directions

  1. “L.” means stage left: the performer’s left, so the right side of a plan drawn with the audience at the bottom. Gilbert writes from the actor’s point of view, as stage directions still do.
  2. “L.C.” and “R.C.” are left-center and right-center: halfway between the centerline and each side.
  3. “First entrance L.” is the gap between the wings nearest the audience on stage left. The cavern has to open there, so the rock must reach that far downstage.
  4. “In the distance” is painted scenery: a drop at the back, not something with a footprint on the floor.
  5. “Discovered” means the pirates are already in place when the curtain rises, so their spots go on the plan too.
  6. What Gilbert leaves out is your choice. He never says where the Pirate King enters. This plan sends him through the arch and keeps that route clear (item 4).
Item list, as you would enter it in the designer (X from the stage-right edge, Y upstage from the downstage edge, in feet)
#ItemDesigner typeFootprint W × DCenter X, YWhy there
1Rock, sloping to L.C.Platform / scenery11 × 1424.5, 9“Rock L. sloping down to L.C.” Note the slope direction in Item notes; the designer draws a rectangle.
2Cavern mouthCustom item3 × 328.5, 3.5Under the rock, seen at the first entrance L.
3Natural arch (4 ft opening)Platform / scenery7 × 210, 11“Occupies the R.C.”: right of the centerline, mid-depth.
4King’s entrance routeKeep-clear area4 × 1010, 10A staging choice: nothing may be set in the arch or its path.
5Pirate group A (3)Performer × 32 × 2 eachabout 7, 5Downstage right, clear of the arch route.
6Pirate group B (3)Performer × 32 × 2 eachabout 17.5, 6Balances group A across the centerline.
7Frederic (seated), RuthPerformer × 22 × 2 each15, 16 and 15, 14.5“At the back of the scene,” on the centerline.
8Sea and schoonerProduction notes—upstageA painted drop has no footprint on the floor.
Check the plan like a stage manager
  • Can the pirates in group A reach the cavern mouth (item 2) without crossing the King’s route? Yes, along the downstage edge, but they must wait until he has passed.
  • The rock is 14 ft deep. Where do actors hide behind it? Stage left of the rock, in the wings. Check that space on your real stage.
  • What would change on a stage only 24 ft wide? Everything scales; the arch might move to 8 ft and the rock shrink to 7 ft wide. Measure first, then plot.

Your turn: click Load Pirates Act I in the designer at the top of the page to inspect and modify this exact 30 × 20 ft layout, or plot a scene from your own musical the same way. Underline every location word in the script first.

Pre-production: stage configurations, sightlines, and spike tape

Before set construction begins, the scenic designer and stage manager translate the ground plan onto the rehearsal room floor and verify that every audience seat can see the action.

Four stage configurations

Proscenium (end-on): Audience faces one side through a picture-frame arch; tall flats and drops go upstage, while masking legs hide the left and right wings.

Thrust (three-sided): The stage projects into the house with audience on three sides. Tall scenery must stay against the back wall so downstage furniture never blocks side-seat views.

Arena (in-the-round): Audience surrounds all four sides. Actors enter through corner aisles (vomitories or “voms”), and only low furniture, platforms, or overhead flown pieces can be used.

Black box: A flexible room where risers and playing areas are rearranged for each production.

Sightlines, masking, and crossovers

Draw an imaginary line from the extreme front-left and front-right audience seats past the proscenium arch and masking legs. Anything inside that wedge is visible to the audience.

In a musical with a 20-person chorus, reserve at least 36 to 48 inches for an unobstructed upstage crossover behind the cyclorama or traveler curtain, and keep offstage prop tables and quick-change booths tucked safely behind the masking legs.

Taping the floor (spike marks)

In week one of rehearsal, the stage management team measures from the centerline and plaster line (back of the proscenium wall) to tape the full-size ground plan onto the rehearsal floor.

During tech week on stage, small L- or T-shaped pieces of cloth spike tape mark where rolling wagons and furniture lock in each scene—using one tape color per act or scene (plus phosphorescent glow tape on black step edges and offstage hazards).
Design, rehearse, revise

  1. Measure the usable stage. Enter its width and depth. Name your production, scene, and revision.
  2. Add scenery and equipment. Rename every item; enter its real width, depth, and center position.
  3. Place at least three performers. Add a clear area for an entrance or shift. Rotate items as needed.
  4. Use Check layout, then trace each actor’s route with a partner. Check views from audience seats and agree on clearance with your teacher.
  5. Write rehearsal changes in your notes. Print the plan and item list, then use Cue Sheets to record when items move.
Practice challenge: a market scene

Load the example. Move the lead to downstage left, keep both clear routes open, and give the bench a useful playing position. Explain how your choices support the action. The example dimensions are invented; replace them with your school’s measurements.

References: American Association of Community Theatre: ground plans and Theatrecrafts: blocking notation.