Draw and build
Orthographic drawings explained exact views; clay, wood, and card models tested volume and proportion.
Start with the editable technique workshop above. Reuse your model in the next lesson. The detailed walkthrough below uses Blender; choose another app using Tool Rosetta and the transfer checklist above.
3D Modeling · 50–65 minutes · Grades 7–12
Turn the starting cube into a measured display block. You will learn where tools act, how to move your view without moving your model, and how to save work you can find again.
Finish line: a reopened 01-interface.blend with a 4 × 2 × 3 block resting on a 6 × 6 floor.
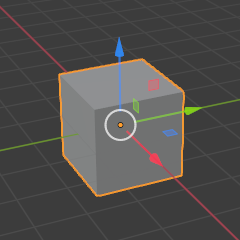
Before the viewport
For centuries, builders and artists described three-dimensional ideas with plans, elevations, perspective drawings, and physical models. Interactive computer graphics changed the speed of that conversation: a designer could select, move, test, and revise geometry on a screen.
Orthographic drawings explained exact views; clay, wood, and card models tested volume and proportion.
Ivan Sutherland demonstrated direct drawing and constraint-based editing with a light pen, helping establish computer-aided design.
Modern 3D tools join views, measurements, materials, animation, and fabrication inside an editable model.
Look before you click: Which older studio tools do you recognize in the interface—drawing surface, camera, ruler, material sample, or timeline?
History sources: Computer History Museum: Sketchpad · Blender Foundation: Blender’s history
01-interface.blend. Next, use numeric transforms and face selection to build a framed window in its own file.Launch
Before you build
Directions use the Blender keymap, left-click selection, and Blender 4.5 LTS. In other versions, find controls by their name and tooltip; their position may differ. Keep Blender open beside this lesson. A sequence such as G Z 1 Enter means press each key in order.
Open Blender and choose General on the splash screen, or File → New → General. Save any other project first.
The standard General startup has Cube, Camera, and Light in the Outliner. Click Layout in the workspace tabs. A customized startup may look different.
File → Save As. Choose your class folder, enter 01-interface.blend, then click Save As in the file browser. Record the folder location.
Hover over the large 3D Viewport. Choose Object Mode in its header and Z → Solid. Use the default scene units throughout: these numbers are Blender units.
REPAIR: If a shortcut types into a field, press Esc, move the pointer into the viewport, then retry. If General opens a customized scene, ask your teacher for the standard starter scene before using the measurements below.
Editor
Four places, four jobs
Click a zone, then point to the matching place in Blender. The Header belongs to the 3D Viewport; the Viewport, Outliner, Properties, and Timeline are separate editors. Keyboard shortcuts usually act in the editor under your pointer.
Header: Switches between Object Mode and Edit Mode, and holds the Add, transform-tool, and snapping controls.
Object Mode moves and arranges whole objects. Edit Mode reaches inside one object to move its individual vertices, edges, and faces. Press Tab to switch between them.
Navigate
Move your view; keep your model still
Drag the colored navigation gizmo to orbit; drag its hand icon to pan and its magnifying glass to zoom. Use 3D Viewport → View → Viewpoint → Front / Right / Top and View → Frame Selected without a numpad.
Optional mouse emulation: Edit → Preferences → Input → Mouse → Emulate 3 Button Mouse uses Alt+left-drag for orbit and Shift+Alt+left-drag for pan. If your desktop intercepts Alt-drag, use the gizmo instead. Emulate Numpad in Input → Keyboard repurposes the number row, including Edit Mode selection shortcuts; this lesson uses clickable selection-mode icons so either setting works.
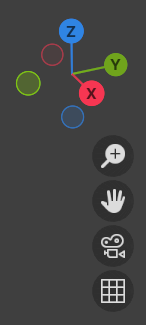
LOOK: Select Cube. In the Sidebar’s Item tab, Location should be 0, 0, 0.
DO: Orbit until you see three cube faces. Pan the cube toward one side, then zoom out and in. Choose View → Frame Selected. Visit View → Viewpoint → Front, then Top. Orbit again; if needed choose View → Perspective/Orthographic to restore perspective.
CHECK: You saw different sides, but Cube’s Location remains 0, 0, 0. Navigation changes your view, not the scene camera or the object.
REPAIR: Lost the cube? See the Rescue section below.
If you zoom in too far, pan off into empty space, or get stuck inside an object, do not panic. The scene is fine; your view is just misplaced.
Transform
The three moves you'll use forever
Read the three controls below, then do the short rehearsal. Left-click selects an object. Keep the pointer over the viewport. Confirm a transform with Enter; Esc cancels it before you confirm. Edit → Undo (Ctrl+Z) reverses a confirmed change.
Move
Press G, move the mouse, click to confirm. Press G Z 2 Enter to move exactly 2 Blender units up the Z axis.
Turn
Press R, move the mouse to spin the object, or type R Z 45 Enter for exactly 45°.
Resize
Press S then drag, or type S 2 Enter to double the size on every axis at once.
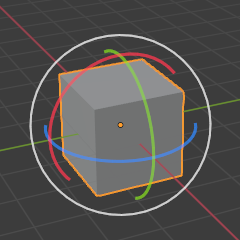
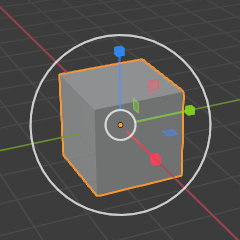
A browser stand-in for Blender’s 3D Viewport. The keys work the same way, so you can rehearse the navigation lap, the transform rehearsal, and the build here, then do them for real in Blender. Handy on a computer without Blender.
Step 1
Mouse: left-click selects (Shift+click adds), middle-drag orbits, Shift+middle-drag pans, the wheel zooms, Shift+right-click places the 3D cursor. No middle button: Alt+left-drag, or drag the gizmo. During G, R or S: X/Y/Z locks an axis, typed numbers set exact values, hold Ctrl to snap, Enter or click confirms, Esc or right-click cancels. Keyboard: while the viewport has focus it keeps Tab for Edit Mode, like Blender does. Press Esc when no tool is running to give the keyboard back to the page.
This browser can’t show 3D graphics (WebGL is off), so the practice viewport is unavailable. Do the rehearsal below in Blender instead.
LOOK: Cube is selected in Object Mode. Sidebar → Item shows Location 0, 0, 0, Rotation 0°, 0°, 0°, Dimensions 2, 2, 2.
DO: Enter G X 2 Enter; check Location X = 2, then Edit → Undo. Enter R Z 45 Enter; check Rotation Z = 45°, then undo. Enter S 2 Enter; check Dimensions = 4, 4, 4, then undo. Finally start G Z, move the mouse, and press Esc.
CHECK: The starting numbers are restored. Scaling by 2 multiplies each length by 2; it does not set the length to 2.
REPAIR: Stop if the starting values differ. Undo the extra transform and recheck. The build assumes this untouched 2-unit cube. Moving with G changes Location; orbiting does not.
Build
Hands on · one measured project
Use the cube you just rehearsed with. Leave the startup camera and light alone; Solid shading lets us inspect geometry before the lighting lesson.
LOOK: Cube is selected; mode is Object Mode; Dimensions are 2, 2, 2.
DO: Enter S X 2 Enter, then G Z 1 Enter. Press F2, type Display_Block, and Enter (or double-click Cube’s name in the Outliner).
CHECK: Sidebar → Item: Location 0, 0, 1, Dimensions 4, 2, 2. The bottom sits at Z = 0 because center height 1 minus half-height 1 equals 0. Save.
REPAIR: If the block is taller rather than wider, undo the scale and repeat with X. Do not repeat S X 2 on an already widened block: it multiplies the width again.
LOOK: Orbit until the top face is clearly visible. Display_Block is the only selected object.
DO: Look at the top left of the viewport. It currently says Object Mode. Press Tab to change this to Edit Mode. Click the Face Select icon (a highlighted square) beside the mode dropdown. Choose Select → None in the viewport, then left-click the top face. Ensure the header’s Proportional Editing circle and X-Ray overlapping-squares button are off. Enter G Z 1 Enter, then press Tab to return to Object Mode.
CHECK: Before the move, only the top face is highlighted; afterward, Dimensions are 4, 2, 3 and Location is still 0, 0, 1. The bottom stayed at Z = 0. Edit Mode changed the inside mesh; it did not move the whole object location. Save.
REPAIR: If the entire block rose, you might not have switched to Edit Mode, or you had all faces selected. Undo, verify you are in Edit Mode, select only the top face, and retry. If a side bulged, undo and orbit above before selecting the top. A circle around the pointer means Proportional Editing is on: press Esc, turn it off, retry.
LOOK: The mode dropdown says Object Mode. This matters: adding a mesh in Edit Mode would merge its geometry into the block.
DO: Press Shift+S → Cursor to World Origin. Then Add → Mesh → Plane in the viewport. Enter S 3 Enter, then name it Display_Floor with F2.
CHECK: The floor’s Location is 0, 0, 0 and Dimensions are 6, 6, 0. A default plane starts 2 units wide, so 2 × 3 = 6. Outliner lists Display_Block and Display_Floor separately; the block rests on the plane.
REPAIR: No separate floor row? Undo the scale and the add, return to Object Mode, then repeat. Floor in the wrong place? Reset the 3D cursor before adding it; new objects appear at the cursor.
LOOK: Confirm both names in the Outliner. Select the block and frame it. Orbit so you can see its top and two sides.
DO: Choose File → Save. Then File → Open, find 01-interface.blend in your class folder, and click Open. Show a partner the model, its object names, and the block’s Dimensions in the Item tab.
CHECK: The reopened file contains the 4 × 2 × 3 block and 6 × 6 floor. A screenshot records what you see; the .blend file keeps editable geometry.
REPAIR: An older cube means you opened another file or missed Save. Check the filename and folder. For a crash, ask your teacher to help inspect File → Recover → Auto Save; save any recovered work under a new name.
After the core checks, use File → Save As to make 01-interface-stretch.blend. Select Display_Block in Object Mode and enter R Z 30 Enter. Orbit and use Front view to check that the bottom still meets the floor. Explain why rotating around vertical Z changes the footprint direction without changing the bottom height. Keep the core file for the measured exit ticket.
Check
Exit ticket
Definition of done
Control references: Blender Manual — navigation, input alternatives, numeric transforms, mesh selection, and opening and saving. Screenshot sources and license.