← Music Music · Strings Music Lab →
Make a practice week →

Touch a string. Find your note.

How to use the fingerboard

Choose a string. Tap its open-string label, or drag along the string to hear pitch change continuously.

Find the center. Drag toward the body to raise pitch. Arrow keys move by semitone; Shift + arrows move a fifth. Release snaps to a note.

Fingerboard close-up Scroll ↑ · Body ↓

Open strings · no finger down

Your note on the staff

Lines: E · G · B · D · F
Spaces: F · A · C · E
Read from bottom to top.

Extra short lines extend the staff. A ♯ or ♭ changes pitch, not the note’s line or space.

Violin practice studio

Scales, Hanon-style sequences and broken triads · first position

Ready.

Practice with your violin

Listen, sing, then play. Each tile shows pitch, string and a suggested first-position finger: 0 = open, L = low, H = high. Prefer open strings at crossings; compare fourth finger with the next open string by ear. Fingerings are suggestions, not fixed rules.

For slurs, change bow only at the start of each numbered group; keep the bow moving through the other notes. The audio models pitches at equal spacing, not a real slurred bow. Broken triads sound one note at a time, not as three-string chords.

These are original violin patterns inspired by Hanon’s sequencing approach, not transcriptions of his piano exercises. Work slowly with a free thumb and light fingers. After three comfortable, accurate repetitions, try 5 more notes per minute. Pause if tension builds; stop if anything hurts.

Note names and finger numbers are learning guides, not frets. Spacing follows equal-tempered pitch; each span is enlarged to fill the view.

The Violin All ages · 3–5 class periods

Hold it. Tune it.
Think in fifths.

Before the first note there is a whole craft: knowing the parts, holding the violin and bow without tension, getting the bow and bridge ready, and tuning four strings by ear. Then you learn to see the fingerboard the way violinists do.

The 15-minute violin ritual

Use this short route with a real violin or the fingerboard explorer below.

  1. PrepareBalance the violin; release jaw, thumb, and shoulders.
  2. Warm upUse open strings; aim for a straight, steady bow.
  3. ReadRead one short pattern: hear it, sing it, place it, then check.
  4. Make musicShape one phrase with bow direction and dynamics.
  5. ReflectName one centered note and one next target.

Advance rule: repeat only while the body stays free. Accuracy and tone come before speed or vibrato.

01

Parts

Meet the instrument

A violin is a hollow wooden box that a bow makes sing.

The bow hair grabs the string and lets go hundreds of times a second. The string pushes on the bridge, the bridge rocks the thin spruce top, and the whole box turns that motion into sound. Every part has a job in that chain. Choose a part to see what it does.

Two important parts are hidden inside. The soundpost is a thin spruce dowel standing between the top and back under the E-string foot of the bridge; it is held only by pressure. The bass bar is a strip of wood glued under the top beneath the G-string foot. Together they let the top vibrate strongly without collapsing under about 25 kilograms of string tension.

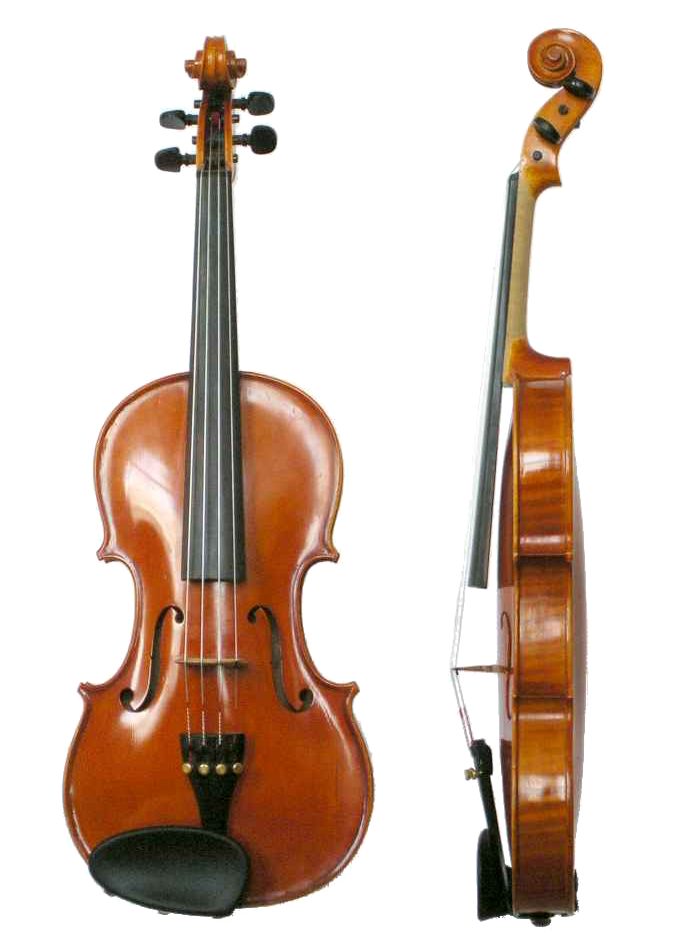
A violin shown from the front and from the side: scroll, pegs, black fingerboard, f-holes, bridge and chinrest
Front and side The long black fingerboard has no frets. From the side you can see it rise above the body, so a finger can stop the string anywhere along it. Just plain Bill · CC0 · source
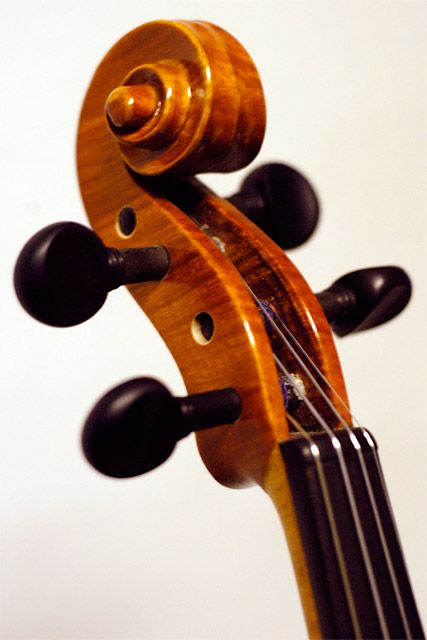
Close-up of a violin scroll and pegbox with dark wooden tuning pegs
Scroll and pegs Each string winds around its own peg in the pegbox. Wood on wood, held by friction: a peg only stays put when it is pushed in as it turns. Dennis Mojado · CC BY 2.0 · source
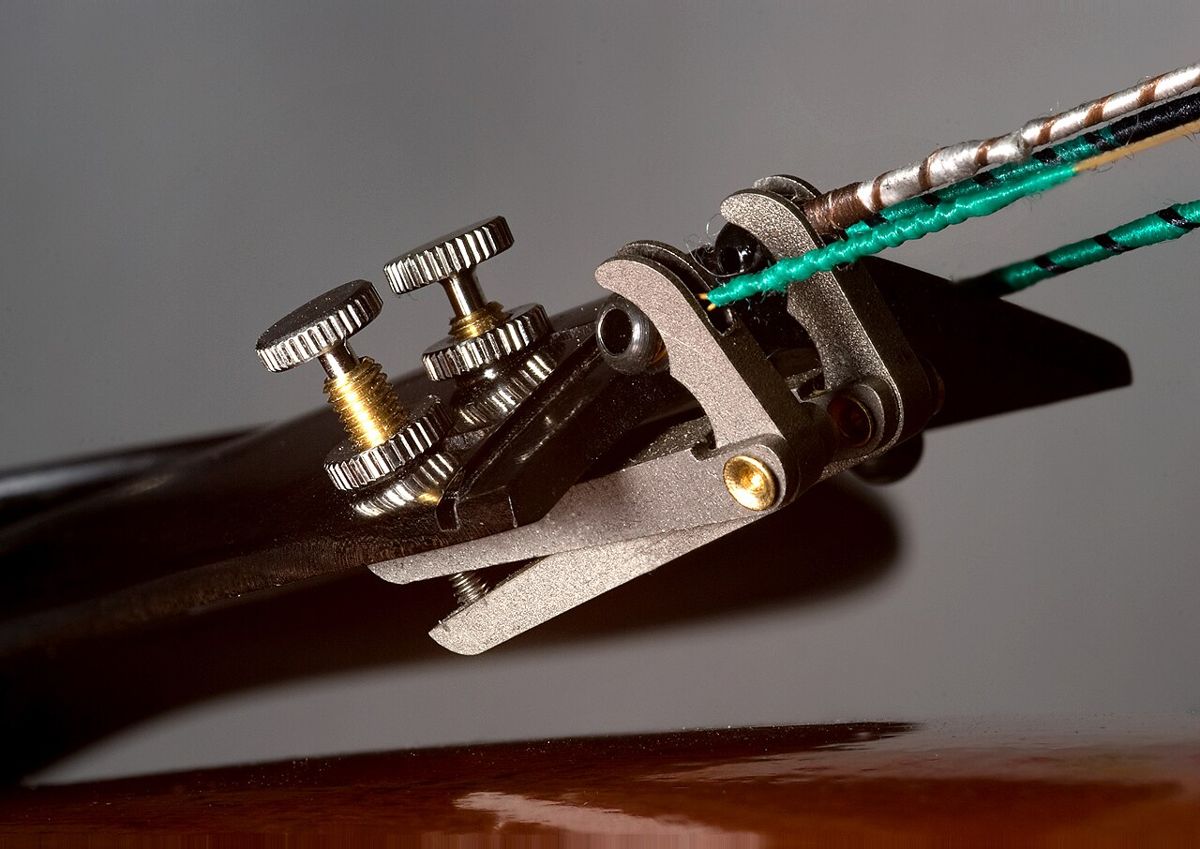
A small metal fine tuner with a knurled screw clamped to a violin tailpiece, with a string hooked into it
A fine tuner A tiny lever on the tailpiece. Turning its screw changes the pitch only a little, which is why beginners use them for small corrections. pjt56 · CC BY-SA 3.0 · source
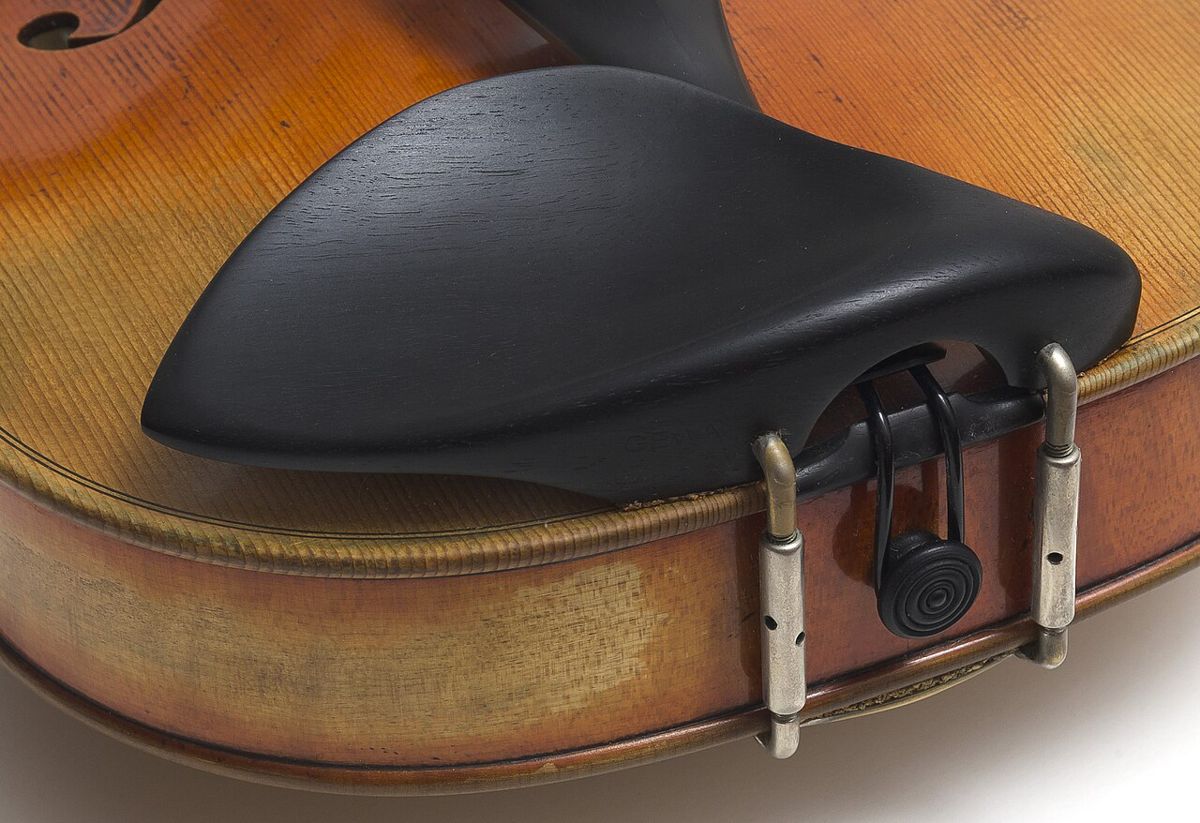
A black chinrest clamped to the lower edge of a violin with metal barrels
The chinrest Clamped to the edge, not glued. The jaw rests here so the left hand never has to hold the violin up. Pjt56 · CC BY-SA 4.0 · source
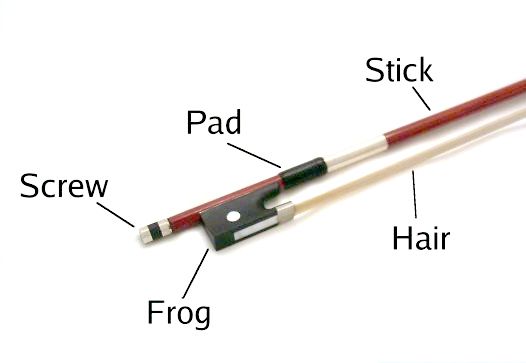
A labelled bow showing the screw, frog, pad, stick and hair
The bow, labelled Screw, frog, pad, stick and hair. The screw moves the frog to tighten or loosen the hair. Kbh3rd · CC BY-SA 3.0 · source
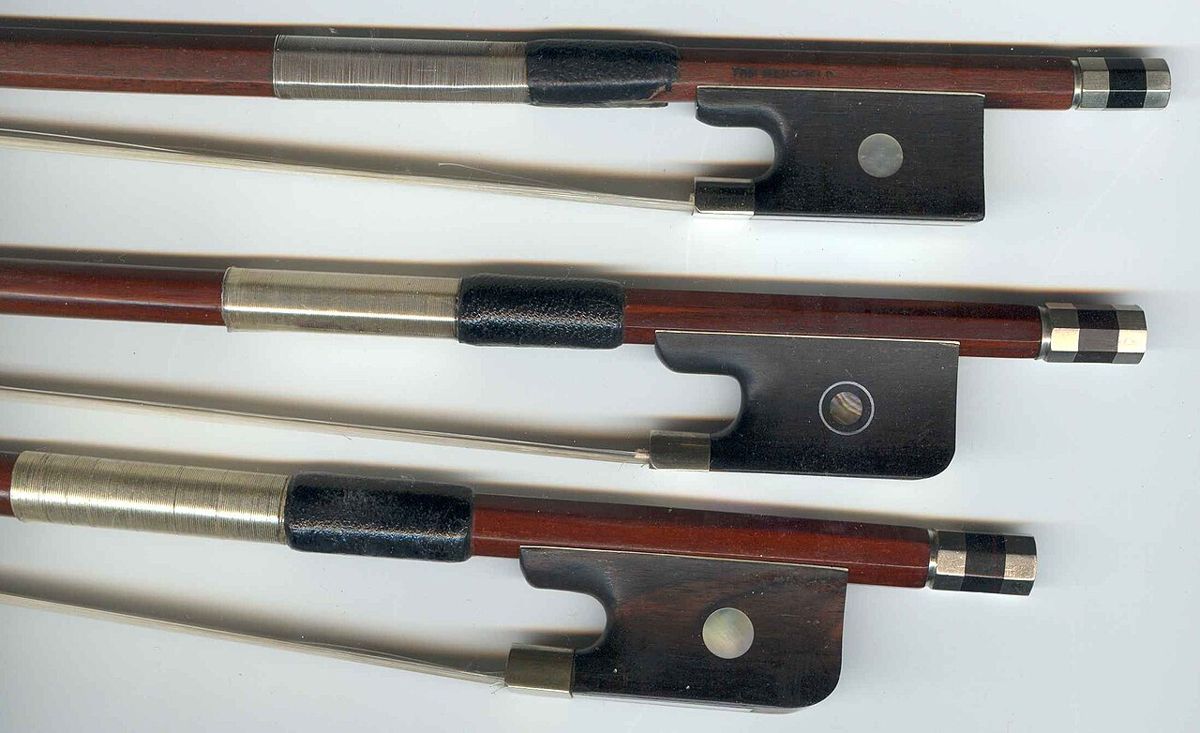
The frog ends of three bows lying side by side, each with a black frog and silver ferrule
Three frogs Violin, viola and cello bows, top to bottom. The frog holds the hair and is where your hand goes; the cello frog is the heaviest. Just plain Bill · public domain · source
02

Hold

Balance, not grip

Hold the violin with your body and the bow with a soft hand.

At any age

  • Young childrenViolins come in small sizes, down to 1/16. A teacher or a violin shop measures your arm to find the one that fits. Never make do with one that is too big.
  • Older kids and teensYou can grow out of a size in a year or two, so check the fit often. Renting makes changing sizes easy.
  • AdultsA full-size (4/4) violin fits most adults. Try a few chin rests and shoulder rests until your neck can stay long, and take breaks before you feel stiff.

Tension is the enemy of good sound. If any part of you is squeezing, the sound gets thin and your hand gets tired. The goal of both holds is balance: gravity and the weight of your arm do the work.

The violin

  1. Rest position. Tuck the violin under your right arm, scroll forward, strings facing out. This is where it waits between pieces.
  2. Lift it in. Hold the lower bout with your right hand and set the violin on your left collarbone, the back on your shoulder or shoulder rest.
  3. Let your head drop. Turn your head a little left and let the jaw settle onto the chinrest. Don't clamp; the weight of your head is enough.
  4. Point the scroll. The scroll points out to your left and slightly forward, about level with the floor, so the bow has a flat road to travel on.
  5. Left hand last. The neck rests between the thumb and the base of the first finger. Straight wrist, relaxed thumb, elbow under the violin.

Test: let go with your left hand. If the violin stays up for a few seconds, you are holding it with your body, not your hand.
The bow

  1. Make a bunny. Touch the tip of your bent thumb to the middle two fingers. Index and pinky stick up like ears.
  2. Thumb in the corner. Put the bent thumb tip on the stick where it meets the frog. The thumb stays bent, never locked straight.
  3. Drape the middle fingers. The middle and ring fingers hang over the stick opposite the thumb, touching the frog.
  4. Index finger leans in. The index finger touches the stick near its middle joint. It is how you press for a louder sound.
  5. Pinky on top. The curved pinky tip sits on top of the stick. It balances the bow so the tip does not drop.

Test: practise the hold on a pencil first. Your fingers should be curved and soft, with no white knuckles.

Common problems and quick fixes
Bow thumb locked straight
Bend it back into the corner of the frog. A straight thumb makes the whole hand stiff.
Pinky flat on the stick
Stand it up on its tip. A flat pinky cannot balance the bow.
Left wrist collapsed under the neck
Straighten the wrist so the palm is not touching the neck. The fingers need room to drop onto the strings from above.
Shoulders creeping up
Breathe out and drop both shoulders. Check this every time you stop.
Scroll pointing at the floor
Bring the scroll up to level. A drooping violin makes the bow slide toward the fingerboard.
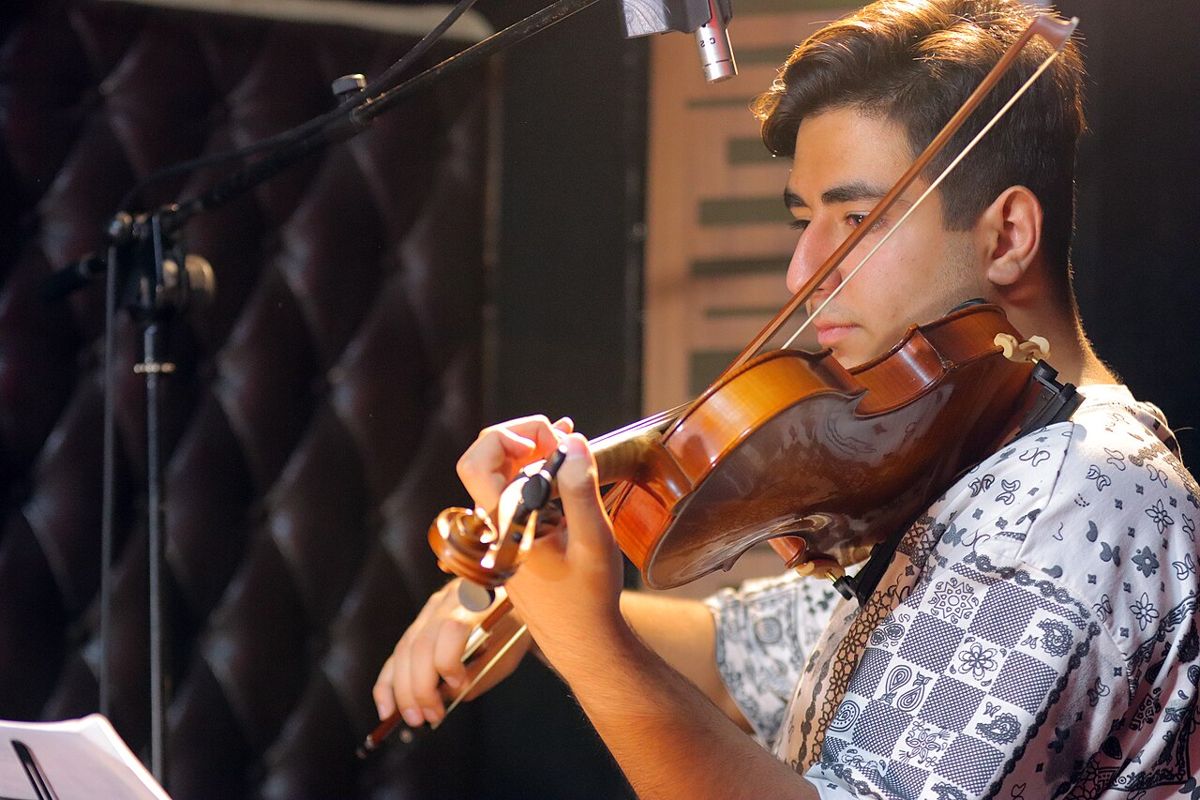
A young violinist playing with eyes closed, violin on the left shoulder, jaw on the chinrest, bow on the string
Playing position Violin on the left shoulder, jaw resting on the chinrest, scroll out to the left. The bow crosses the string about halfway between the bridge and the fingerboard. Mostafameraji · CC BY 4.0 · source
Watch a master’s hold and bow arm. Yehudi Menuhin plays the Prelude from Bach’s Partita No. 3 for solo violin. The violin rests on his collarbone and chin, so the left hand is free to move, and the bow rocks between strings without stopping. Concert Films Corporation, 1948, public domain, via Wikimedia Commons.
03

Bow ready

Before every practice

Tighten the hair, rosin it, and loosen it when you finish.

Bow hair is stored loose so the stick keeps its curve. Before you play, you tighten it with the screw on the end of the frog, then give it rosin so it can grip the string. Drag the slider to tighten this bow and watch the gap between the hair and the stick.

1 · Tighten

Turn the screw clockwise (righty-tighty) a few turns. Stop when the gap between the hair and the stick at its narrowest point, near the middle, is about the width of a pencil. The stick should still curve slightly toward the hair.

2 · Rosin

Hold the rosin still and draw the whole length of the hair across it, three to five slow strokes. New hair needs more. Too much leaves white dust and a scratchy sound. Never touch the hair with your fingers; skin oil stops rosin from sticking.

3 · Loosen and wipe

When you finish, loosen the screw until the hair hangs slack, then wipe the rosin dust off the strings and the top with a soft dry cloth. A bow left tight for days slowly loses its curve and its spring.

04

Bridge

Check it every week

The bridge is not glued. String pressure is all that holds it up.

Every time you tune up, the strings slide over the bridge toward the scroll and drag its top with them. Little by little the bridge leans toward the fingerboard. Left alone, it can warp or snap flat onto the top. Drag the slider to lean this bridge, then bring it back to standing straight.

What a well-set bridge looks like

  • Seen from the side, the back of the bridge (the side facing the tailpiece) stands straight up from the top, at a right angle.
  • Both feet sit flat on the top, with no gap under either edge.
  • It stands between the little notches cut into the inner edges of the f-holes.
  • The high side is under the G string and the low side under the E string.
  • It is centered under the fingerboard, so the strings are evenly spaced.

Straightening a leaning bridge

  1. Rest the violin on your lap, scroll pointing away from you.
  2. Hold the top of the bridge with both thumbs and first fingers.
  3. Gently ease the top back toward the tailpiece a tiny bit at a time, checking from the side after each nudge.
  4. Never loosen all four strings at once. The bridge and the soundpost inside can fall.

Stop and ask your teacher if the bridge has fallen, is cracked or warped, or if something rattles inside the violin. A loose soundpost has to be set by a teacher or a luthier, with a special tool.

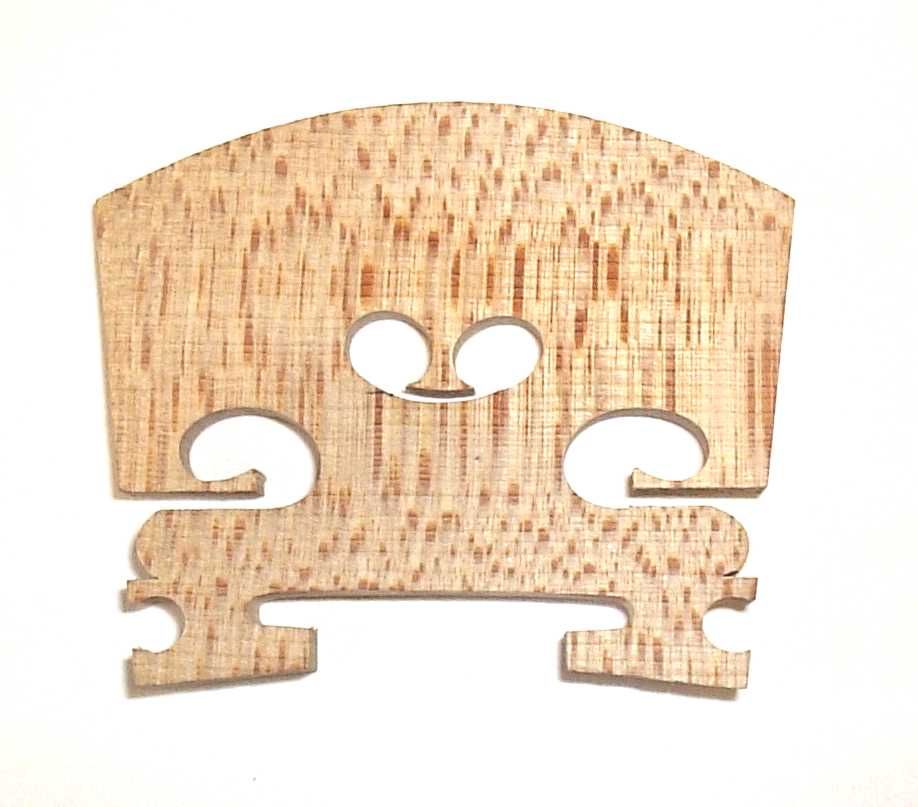
A pale maple violin bridge blank with heart-shaped and kidney-shaped cut-outs and two feet
A bridge before fitting Maple, cut thin with openings so it can flex. A luthier carves the feet to match the curve of each violin top, so a bridge from one violin will not fit another. Netazon · CC BY-SA 3.0 · source
05

Tune

Use your ears

Four strings, each a perfect fifth from the next.

From lowest to highest the strings are G D A E. Neighbouring strings are a perfect fifth apart, so when two neighbours are in tune and played together they sound smooth and ringing. When they are out of tune you hear a wobble called beating. Violinists tune the A first, to a tuning note of A = 440 Hz, then tune each other string against its in-tune neighbour.

Hear each open string

Hear neighbours together

Pegs and fine tuners

Pegs make big changes. Turn the peg while pushing it gently into the pegbox so it holds. The G and D pegs are on the left side of the pegbox, A and E on the right.

Fine tuners on the tailpiece make small changes. Turn clockwise to raise the pitch, counter-clockwise to lower it. Most violins have one on the E string, and student violins often have four.

Always come up to the note from below. If you overshoot, go a little under and come up again. A string tuned down to pitch tends to slip flat.

The order

  1. A to the tuning note (A = 440 Hz).
  2. D: play D and A together and adjust D until the wobble stops.
  3. G: play G and D together and adjust G.
  4. E: play A and E together and adjust E, usually with its fine tuner.

Try it: tune the D string

This D string is out of tune. Play it with the A string, listen for the wobble, and use the peg for big moves and the fine tuner for small ones until the two strings ring together.

Peg
Fine tuner

06

Think in violin

See the fingerboard like a violinist

No frets, no keys: you find every note by ear and by pattern.

A pianist sees each note as its own key. A violinist sees a few patterns and repeats them everywhere. These four ideas are how violinists think:

Every string is a fifth

Put a finger down and move it to the same spot on the next string up: the note is a perfect fifth higher. The same finger shape works on all four strings, just starting from a different note.

Space or touch

Fingers that are a whole step apart have a gap between them. Fingers a half step apart touch. A finger pattern is just the order of gaps and touches, like “2 and 3 touch” for a major scale on D.

Hear it first

Sing or imagine the note before you place the finger. Your ear guides the finger to the right spot, and you correct a note you can hear is off. This is called intonation.

Two hands, two jobs

The left hand chooses the pitch. The right hand, with the bow, makes the sound: loud or soft, smooth or short. The bow is the violin’s breath.

Now try it on the explorer. Drag along a string to hear the pitch slide, then use Patterns to light up a scale and see the gaps and touches.

07

Check

Exit ticket

Eight quick questions.

1. What does the bridge do?
2. In a good bow hold, the thumb is…
3. How tight should the bow hair be?
4. Why loosen the bow after playing?
5. A well-set bridge, seen from the side, has its back face…
6. Which string do violinists usually tune first?
7. What interval apart are neighbouring open strings?
8. Two fingers a half step apart on the same string…

Sources and scope

Holds and setup steps describe common beginner teaching (a Franco-Belgian style bow hold, tuning A to 440 Hz first). Teachers vary in details such as thumb placement and shoulder rests; follow your teacher where they differ. Pitch in the explorer is synthesized in equal temperament.